Introduction
The chocolate tart tops the list when it comes to indulgent desserts that strike the perfect balance between elegance and richness. Whether you’re a seasoned baker or a casual dessert enthusiast, this treat is a delightful combination of buttery pastry and luscious chocolate filling. Imagine a velvety chocolate center nestled inside a crisp, golden crust—a dessert that’s impressive and surprisingly easy to prepare. In this guide, we’ll dive into everything you need to know to make the perfect chocolate tart from scratch, ensuring it becomes a go-to dessert in your repertoire.

Table of Contents
Why You’ll Love This Recipe
If you’re still on the fence, let us convince you why this chocolate tart deserves a place in your kitchen. There’s something magical about the simplicity of this dessert. It requires just a handful of pantry staples, yet the results are spectacular. Here’s why you’ll love this recipe:
- Luxurious Flavor: The deep, rich chocolate filling delivers an intense cocoa flavor, balanced by the buttery crispiness of the tart crust. It’s a chocolate lover’s dream.
- Impressive Yet Simple: Whether you’re hosting a dinner party or just treating yourself, this chocolate tart makes an elegant statement without complicated steps.
- Customizable: You can tweak this recipe to match your preferences. Add a touch of orange zest for citrusy notes, sprinkle flaky sea salt on top for contrast, or incorporate a splash of coffee for depth.
- Perfect for Any Occasion: Be it a birthday celebration, a romantic dinner, or a casual weekend treat, this dessert shines in every setting.
- Make-Ahead Friendly: This tart can be prepared in advance, allowing you to focus on other tasks when entertaining guests. Store it in the refrigerator, and it’s ready to go when you are.
Detailed Ingredients and Instructions
Creating a flawless chocolate tart starts with understanding the key components that make it unique. Let’s break it down step by step.
The Crust
The crust is the foundation of your tart. A well-made crust provides a sturdy, buttery base that perfectly complements the silky chocolate filling.
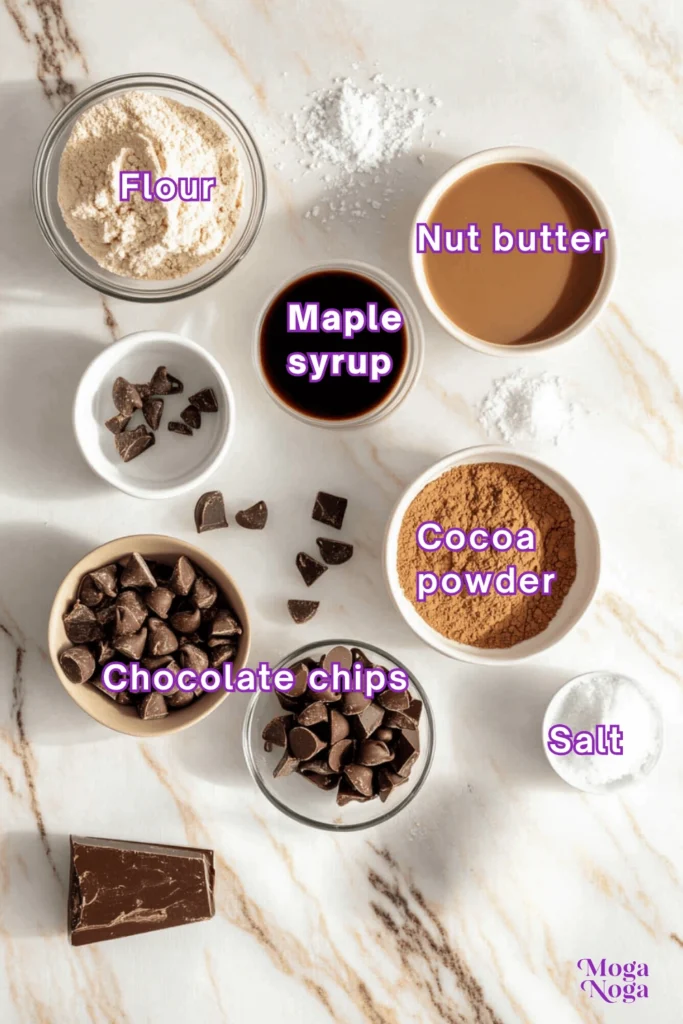
Ingredients for the Crust:
- All-purpose flour
- Unsalted butter, cold and cubed
- Granulated sugar
- A pinch of salt
- Ice water
Step-by-Step Instructions:
- Mix the Dry Ingredients: Combine the flour, sugar, and salt in a mixing bowl.
- Incorporate Butter: Add the cold, cubed butter and work it into the flour mixture using a pastry cutter or your fingertips. The result should resemble coarse crumbs.
- Add Water Gradually: Sprinkle in the ice water a tablespoon, mixing gently until the dough comes together. Be careful not to overmix.
- Chill the Dough: Form the dough into a disk, wrap it in plastic wrap, and refrigerate for at least 30 minutes. Chilling helps relax the gluten and makes the dough easier to roll.
- Roll and Fit the Dough: Roll the dough out on a floured surface and gently press it into your tart pan once chilled. Trim any excess and prick the base with a fork to prevent puffing during baking.
- Blind Bake: Line the crust with parchment paper, fill it with pie weights or dried beans, and bake at 375°F (190°C) for 15-20 minutes. Remove the weights and bake for an additional 5 minutes until golden brown. Set aside to cool.
The Filling
Now for the star of the show—the chocolate filling. This is where the magic happens, transforming simple ingredients into a silky, decadent masterpiece.
Ingredients for the Filling:
- High-quality dark chocolate, chopped
- Heavy cream
- Granulated sugar
- Unsalted butter
- Eggs
- Vanilla extract (optional)
Step-by-Step Instructions:
- Melt the Chocolate: Combine the chopped chocolate and butter in a heatproof bowl. Set the bowl over a pot of simmering Water (double boiler method) and stir until it is melted and smooth. Remove from heat.
- Heat the Cream and Sugar: In a separate saucepan, heat the heavy cream and sugar over medium heat until the sugar dissolves and the mixture is hot (but not boiling).
- Combine and Cool: Gradually whisk the warm cream mixture into the melted chocolate, stirring constantly to create a glossy, smooth filling. Let it cool slightly.
- Incorporate the Eggs: Whisk the eggs in a small bowl, then slowly add them to the chocolate mixture while stirring continuously. This step ensures the eggs don’t curdle.
- Add Vanilla (Optional): Stir in a splash of vanilla extract for added depth of flavor.
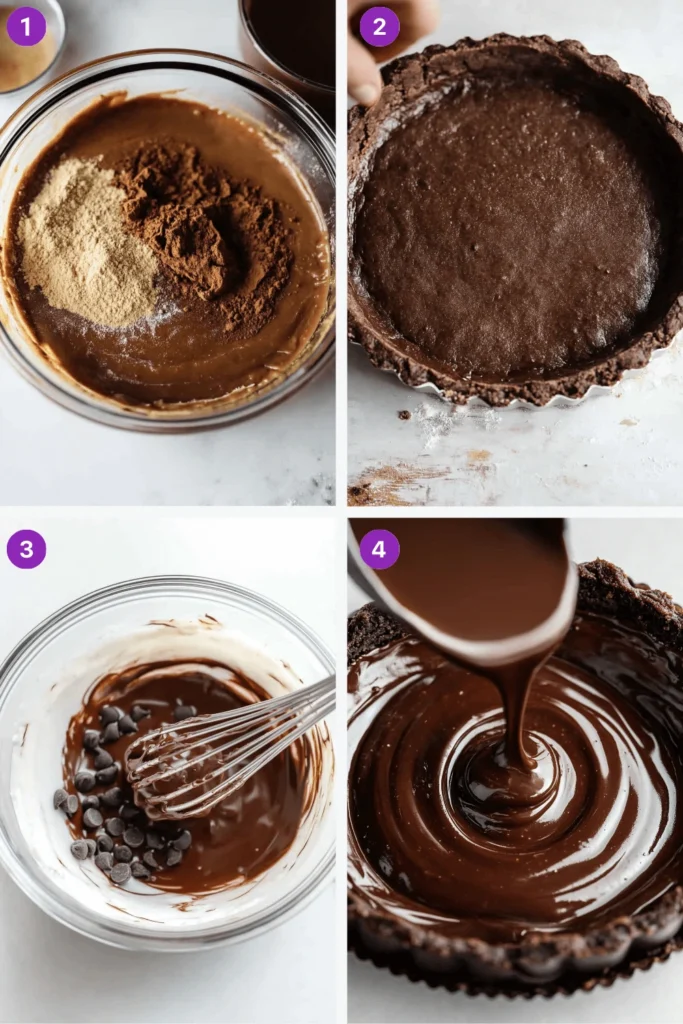
Assembling the Tart
- Fill the Crust: Pour the prepared chocolate filling into the cooled tart crust, spreading it evenly.
- Bake: Bake the tart at 325°F (160°C) for 20-25 minutes, until the filling is set but still slightly wobbly in the center.
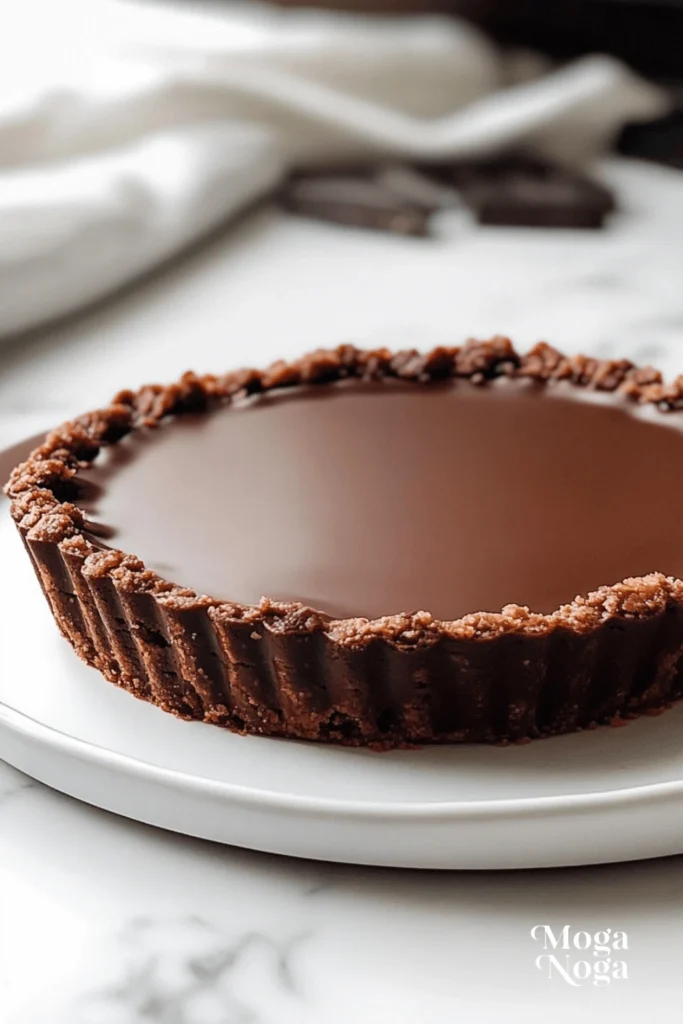
- Cool Completely: Allow the tart to cool at room temperature before refrigerating it for at least 2 hours. This step ensures the filling sets properly.
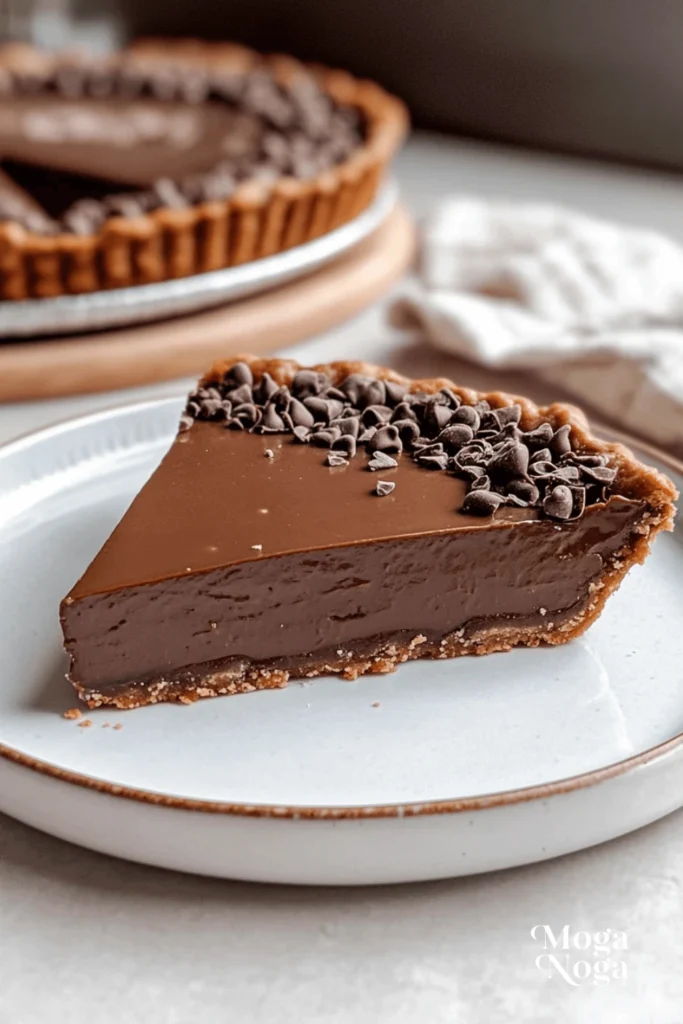
- Serve and Enjoy: Slice the tart into wedges and serve as is, or garnish with whipped cream, fresh berries, or a dusting of cocoa powder for an extra touch of elegance.
Tips, Variations, and Storage Options
Mastering a chocolate tart is easier than you might think, especially with helpful tips and creative variations. Knowing how to store your tart properly ensures it stays as delicious as when you first made it.
Tips for Perfect Results
- Use High-Quality Chocolate: The quality of chocolate you use directly impacts the flavor of the tart. Opt for chocolate with at least 60-70% cocoa for a deep, rich taste.
- Don’t Overwork the Dough: When making the crust, handle the dough as little as possible to prevent it from becoming tough. Work quickly to maintain its flakiness.
- Prevent a Soggy Bottom: Blind baking the crust is essential to avoid a soggy base. Prick the crust with a fork and use pie weights for even baking.
- Let the Filling Cool Slightly: Adding eggs to a piping-hot chocolate mixture can lead to scrambled eggs. Allow the chocolate mixture to cool for a few minutes before combining.
- Check for Doneness: The filling should be set around the edges but slightly jiggly in the center when you remove it from the oven. It will firm up as it cools.
Variations to Try
While the classic chocolate tart is undeniably delicious, there are many ways to customize it to suit your taste or the occasion.
- Salted Caramel Layer: Add a layer of homemade salted caramel beneath the chocolate filling for a luxurious twist.
- Nutty Crunch: Sprinkle chopped hazelnuts, almonds, or pistachios on top of the tart before baking for added texture and flavor.
- Citrus Infusion: Stir in some orange zest or a splash of orange liqueur to the filling for a bright, tangy contrast.
- Spicy Kick: Add a pinch of cayenne pepper or cinnamon to the chocolate mixture for a subtle heat.
- Mocha Madness: Incorporate a shot of espresso or instant coffee granules into the filling for a mocha-inspired treat.
Storage Options
Storing your chocolate tart properly is key to maintaining its flavor and texture. Here’s how to do it:
- Refrigerator: Store the tart in an airtight container or wrap it tightly with plastic wrap. It will keep in the fridge for up to 5 days.
- Freezer: If you’d like to save your tart for a later date, you can freeze it. Wrap it securely in plastic wrap and aluminum foil to prevent freezer burn. Freeze for up to 3 months. Thaw in the refrigerator overnight before serving.
- Serving Leftovers: To enjoy leftover tart, allow it to sit at room temperature for 15-20 minutes before serving. This ensures the filling reaches its optimal creamy consistency.
Equipment Needed
Making a chocolate tart doesn’t require an arsenal of fancy kitchen gadgets. With just a few essential tools, you’ll be on your way to creating a dessert that looks and tastes like it came straight out of a bakery.
- Tart Pan: A fluted tart pan with a removable bottom is ideal for achieving the classic tart shape and making it easy to remove the tart after baking.
- Pastry Cutter or Food Processor: To make the crust, a pastry cutter or food processor helps blend the butter into the flour quickly and efficiently.
- Rolling Pin: A sturdy rolling pin is essential for evenly rolling out dough.
- Pie Weights or Dried Beans: These are used for blind baking the crust to prevent it from puffing up in the oven.
- Heatproof Bowl: A heatproof bowl is needed to melt the chocolate using the double boiler method.

Related Recipes
If you love this chocolate tart, you will surely enjoy these equally delicious and elegant dessert recipes. They all feature-rich flavors and simple techniques, making them perfect for any occasion.
- Chocolate Mousse: A light and airy dessert made with whipped cream and melted chocolate, perfect for serving in individual portions.
- Chocolate Lava Cake: A decadent dessert with a gooey molten chocolate center that’s always a crowd-pleaser.
- French Silk Pie: A creamy chocolate pie with a graham cracker crust, topped with whipped cream for a silky-smooth finish.
- Ganache-Filled Eclairs: Delicate choux pastry filled with chocolate ganache and topped with a glossy chocolate glaze.
- Dark Chocolate Brownies: Rich, fudgy brownies that are easy to make and packed with intense chocolate flavor.
Pairing/Serving Suggestions
A chocolate tart is a showstopper, but pairing it with complementary flavors can elevate your dessert game. Here are some serving suggestions and pairing ideas to enhance your experience.
Serve With:
- Whipped Cream: A lightly sweetened whipped cream dollop adds a fluffy, airy contrast to the dense chocolate filling.
- Fresh Berries: Raspberries, strawberries, or blackberries provide a tartness that balances the richness of the chocolate.
- Vanilla Ice Cream: A scoop of creamy vanilla ice cream pairs perfectly with the tart’s warm, slightly melty texture.
- Powdered Sugar or Cocoa Powder: Dust the top of the tart with powdered sugar or cocoa powder for a polished, professional touch.
Pair With:
- Coffee: The bitterness of coffee complements the sweetness of the tart, creating a balanced flavor combination.
- Red Wine: A glass of robust red wine, such as Merlot or Cabernet Sauvignon, pairs beautifully with the richness of the chocolate.
- Dessert Liqueurs: Serve with a small glass of Baileys, Kahlúa, or Frangelico for a boozy, indulgent treat.
Frequently Asked Questions
You might have questions about making a chocolate tart or want to perfect your technique. Below, we’ve answered some of the most common questions to help you achieve dessert perfection.
1. Can I use milk chocolate instead of dark chocolate?
Absolutely! While dark chocolate provides a rich and intense flavor, milk chocolate offers a creamier, sweeter alternative. Remember that milk chocolate has a higher sugar content, so slightly reduce the sugar in the filling to balance the sweetness.
2. What type of tart pan should I use?
A metal tart pan with a removable bottom works best. The metal ensures even heat distribution for a perfectly baked crust, while the removable bottom lets you easily lift the tart out of the pan without damaging it. You can use a pie dish if you don’t have a tart pan, but the presentation may differ slightly.
3. Can I make this tart gluten-free?
Yes! Substitute the all-purpose flour in the crust with a gluten-free blend designed for baking. Double-check that your other ingredients, such as chocolate, are gluten-free.
4. How do I prevent my tart crust from shrinking?
To prevent shrinkage, chill your dough thoroughly before rolling it out and again after fitting it into the pan. Avoid stretching the dough while pressing it into the tart pan, as this can cause it to shrink back during baking. Pricking the base with a fork and blind baking with pie weights helps maintain its shape.
5. My chocolate filling cracked during baking—what went wrong?
Overbaking or baking at too high a temperature can cause the filling to crack. Bake the tart at a low temperature (around 325°F or 160°C) and remove it from the oven when the filling is set but still slightly wobbly in the center. The residual heat will finish cooking the filling as it cools.
6. Can I make the tart ahead of time?
Yes, this chocolate tart is perfect for making in advance. Prepare and bake the pie up to 1-2 days ahead, then store it in the refrigerator. Please bring it to room temperature for the best texture and flavor before serving.
7. How do I make a shiny ganache topping for the tart?
Heat equal parts heavy cream and chopped chocolate until the chocolate melts completely to make a glossy ganache topping. Stir until smooth and shiny, then pour it over the cooled tart. Let the ganache set before slicing.
Nutrition Information
Understanding the nutritional value of your chocolate tart can help you enjoy this dessert in moderation. Below is an estimate of the nutritional content per serving, based on a standard 9-inch tart cut into eight slices.
- Calories: ~350
- Protein: ~5g
- Carbohydrates: ~30g
- Fats: ~25g
- Saturated Fat: ~15g
- Cholesterol: ~80mg
- Fiber: ~3g
- Sugar: ~20g
- Sodium: ~80mg
Please note that these values are approximate and can vary based on specific ingredients and portion sizes. Consider reducing the sugar or using a lower-fat cream for a lighter version.
Seasonal and Occasion Variations
One of the best things about a chocolate tart is its versatility. With just a few simple tweaks, you can adapt this recipe to suit any season, holiday, or special occasion.
Spring and Summer Variations
- Fresh Fruit Toppings: Garnish the tart with sliced strawberries, raspberries, or fresh cherries for a bright and refreshing twist.
- Citrus Accent: Add a lemon or lime curd layer beneath the chocolate filling to create a tangy contrast.
Fall and Winter Variations
- Spiced Chocolate Tart: Mix a pinch of cinnamon, nutmeg, or cardamom into the filling for warm, cozy flavors.
- Peppermint Infusion: Stir in a drop of peppermint extract and top the tart with crushed candy canes for a festive holiday dessert.
Special Occasions
- Valentine’s Day: Shape the crust into a heart-shaped tart pan and garnish with red berries for a romantic dessert.
- Thanksgiving: Pair the chocolate filling with a thin layer of pumpkin puree and spice for a seasonal twist.
- Birthdays and Anniversaries: Decorate the tart with edible gold leaf, chocolate curls, or a personalized message written in melted white chocolate.
My Recipe Tips
Here are a few pro tips to ensure your chocolate tart turns out perfectly every time:
- Chill Your Tools: When making the crust, keep your tools (such as the bowl, rolling pin, and tart pan) as cool as possible. This prevents the butter in the dough from melting prematurely.
- Use a Double Boiler: A double boiler helps maintain gentle heat, preventing the chocolate from seizing or burning. If you don’t have a double boiler, place a heatproof bowl over a pot of simmering Water.
- Experiment with Chocolate Blends: For a more complex flavor, try mixing different types of chocolate, such as dark chocolate and semi-sweet chocolate.
- Rest the Tart Before Serving: Allow the tart to rest at room temperature for 10-15 minutes before slicing. This ensures the filling is soft and creamy but still holds its shape.
- Decorate Strategically: For a polished presentation, keep garnishes simple. A few fresh berries, a sprinkle of cocoa powder, or a drizzle of caramel sauce can elevate the look without overpowering the tart.

Conclusion
And there you have it—everything you need to know to create the ultimate chocolate tart! From mastering the buttery, flaky crust to perfecting the silky-smooth chocolate filling, this dessert is a true showstopper that’s sure to impress. Whether you’re making it for a special occasion, a family dinner, or simply as a treat for yourself, the chocolate tart is a versatile and elegant dessert that never goes out of style.
Remember, the beauty of this recipe lies in its simplicity and adaptability. With a few pantry staples and some essential equipment, you can create a dessert that’s as sophisticated as indulgent. Don’t forget to make it your own by experimenting with different variations, toppings, and pairings to suit your preferences or the season.
Now that you’re equipped with all the tips, tricks, and inspiration to make a chocolate tart, it’s time to roll up your sleeves and get baking. We guarantee that once you take your first bite of this luscious dessert, you’ll want to make it again and again.
If you enjoyed this recipe, don’t forget to check out our other dessert recipes for more inspiration. There’s something for everyone, from decadent chocolate cakes to light and fruity tarts. Happy baking!

Ingredients
For the Crust:
- 1 1/4 cups (160g) all-purpose flour
- 1/4 cup (30g) powdered sugar
- 1/4 teaspoon salt
- 1/2 cup (115g) unsalted butter, cold and cubed
- 1 large egg yolk
- 2 tablespoons cold water
For the Chocolate Filling:
- 1 cup (240ml) heavy cream
- 1/4 cup (60ml) whole milk
- 8 ounces (225g) dark chocolate, chopped
- 2 tablespoons unsalted butter
- 1 teaspoon vanilla extract
- 1/4 teaspoon salt
For Garnish (Optional):
- Whipped cream
- Fresh berries
- Chocolate shavings
Instructions
- Prepare the Crust:
- In a food processor, pulse the flour, powdered sugar, and salt to combine. Add the cold butter and pulse until the mixture resembles coarse crumbs.
- Add the egg yolk and cold water, pulsing until the dough comes together.
- Form the dough into a disc, wrap in plastic wrap, and refrigerate for at least 30 minutes.
- Bake the Crust:
- Preheat the oven to 375°F (190°C). Roll out the chilled dough on a lightly floured surface to fit a 9-inch tart pan. Press the dough into the pan and trim the edges.
- Prick the bottom of the crust with a fork. Line with parchment paper and fill with pie weights or dried beans.
- Bake for 15 minutes, remove the weights, and bake for another 10 minutes, or until golden. Let cool completely.
- Make the Chocolate Filling:
- In a saucepan, heat the heavy cream and milk over medium heat until just simmering. Remove from heat and pour over the chopped chocolate. Let sit for 2 minutes, then stir until smooth.
- Stir in the butter, vanilla extract, and salt until fully combined.
- Assemble the Tart:
- Pour the chocolate filling into the cooled crust, smoothing the top with a spatula. Refrigerate for at least 2 hours, or until set.
- Garnish and Serve:
- Garnish with whipped cream, fresh berries, or chocolate shavings before serving. Slice and enjoy!
