
Cherry Pie Bars are the kind of dessert that quietly steal the spotlight. They look simple, almost humble, until that first buttery bite melts into bright cherry filling. And suddenly, you’re not just eating dessert, you’re tasting comfort wrapped in sweetness.
Table of Contents
Why You’ll Love This Recipe
There’s something undeniably inviting about cherry pie bars cooling on the counter. The ruby-red filling peeks through a golden crust, and the aroma alone makes it nearly impossible to wait. This recipe isn’t just easy, it’s deeply satisfying in all the right ways.
- Easy Yet Impressive: These bars come together with simple pantry ingredients, but the finished result looks bakery-worthy. You don’t need fancy skills to create something that feels special.
- Perfectly Balanced Flavor: The buttery crust and topping gently cradle the sweet-tart cherry filling. Every bite delivers contrast without overpowering your palate.
- Great for Sharing: Unlike a traditional pie that requires careful slicing, cherry pie bars are neat, portable, and easy to serve. They’re ideal for gatherings, potlucks, or late-night kitchen conversations.
- Make-Ahead Friendly: They taste even better after resting, which means less stress and more time to enjoy your guests.
Once you make these cherry pie bars, they’ll quickly become the dessert you reach for when you want something reliable, nostalgic, and just a little indulgent.
Detailed Ingredients and Instructions
Let’s walk through what makes these cherry pie bars truly irresistible.
Ingredients Breakdown
Every ingredient plays a specific role in creating that signature texture and flavor.
- Unsalted Butter: The foundation of the crust and topping. It provides richness and creates that tender, melt-in-your-mouth texture.
- Granulated Sugar: Sweetens the dough and helps create a lightly crisp, golden exterior.
- Eggs: Bind everything together and add structure to the base layer.
- Vanilla Extract: Enhances sweetness and adds warmth without overwhelming the cherry flavor.
- All-Purpose Flour: Forms the sturdy yet soft structure of the bars.
- Salt: Balances the sweetness and sharpens the overall flavor profile.
- Cherry Pie Filling: The heart of these cherry pie bars. It delivers vibrant color, juicy texture, and that nostalgic sweet-tart punch.
Step-by-Step Instructions
- Cream the Butter and Sugar: Beat the softened butter with sugar until light and fluffy. This step incorporates air, ensuring your crust isn’t dense or heavy.
- Add Eggs and Vanilla: Mix in eggs one at a time, then stir in vanilla extract. This creates a smooth, cohesive batter that holds its structure while baking.
- Incorporate Dry Ingredients: Gradually add flour and salt. Mixing gently at this stage prevents overworking the dough, which keeps the bars tender.
- Press the Base Layer: Spread about two-thirds of the dough evenly into a lined baking pan. This forms the sturdy base that supports the filling.
- Add Cherry Filling: Spoon the cherry pie filling evenly over the base. Spread gently to ensure every bite has that luscious fruit layer.
- Top with Remaining Dough: Drop small spoonfuls of the remaining dough over the filling. It doesn’t need to be perfect. The rustic look is part of the charm.
- Bake Until Golden: Bake until the top turns lightly golden and the edges begin to pull away from the pan. This signals the crust has set properly.
- Cool Completely Before Slicing: Patience matters here. Cooling allows the filling to thicken and ensures clean, beautiful slices.
Tips, Variations, and Storage Options
Once you’ve mastered the base recipe, there are so many ways to make these cherry pie bars your own.
Expert Tips
- Use Room Temperature Ingredients: Butter and eggs blend more smoothly when not cold, giving you a consistent texture throughout.
- Line the Pan with Parchment Paper: This makes removal effortless and keeps the bars intact when slicing.
- Allow Full Cooling Time: Cutting too early can cause the filling to spill. Let them rest for neat edges and clean presentation.
Delicious Variations
- Almond Twist: Add a splash of almond extract to complement the cherry flavor beautifully.
- Chocolate Drizzle: Once cooled, drizzle melted dark chocolate over the top for a decadent finish.
- Mixed Berry Version: Replace part of the cherry filling with raspberry or blueberry for a layered berry flavor.
Storage Options
- Room Temperature Storage: Store in an airtight container for up to two days to maintain freshness.
- Refrigeration: Keep refrigerated for up to five days. The filling firms up slightly, creating a denser bite.
- Freezing Option: Wrap individual bars tightly and freeze for up to three months. Thaw overnight in the refrigerator.
Equipment Needed
You don’t need a complicated setup to make cherry pie bars, and that’s part of their appeal.
- Mixing Bowl: Essential for combining wet and dry ingredients smoothly.
- Electric Mixer or Hand Whisk: Helps cream butter and sugar efficiently for the right texture.
- 9×13 Baking Pan: Provides the perfect thickness for sturdy yet tender bars.
- Parchment Paper: Makes lifting and slicing effortless without sticking.
With just these basic tools, you’re ready to create something that feels both nostalgic and freshly baked with care.
Related Recipes
If cherry pie bars have won you over, there’s a good chance you appreciate desserts that feel nostalgic but still impress. These recipes carry that same comforting energy while offering their own personality.
- Classic Apple Crumble Bars: Think warm cinnamon apples layered over a buttery crust and finished with a crumbly topping. They deliver cozy fall flavor in an easy-to-slice format.
- Blueberry Lemon Shortbread Bars: Bright citrus zest paired with juicy blueberries creates a sweet-tart contrast similar to cherry pie bars, but with a refreshing twist.
- Peach Cobbler Squares: Soft, syrupy peaches nestled between tender layers of dough. Perfect when stone fruit is in season and you want something slightly softer and juicier.
- Pecan Pie Cobbler: Buttery caramel filling layered with toasted pecans and a soft, golden crust creates a rich, gooey dessert that feels indulgent yet comforting, like a Southern classic reimagined with effortless charm.
- Strawberry Oat Crumb Bars: A heartier texture with rolled oats and jammy strawberries. These lean slightly breakfast-adjacent but still satisfy dessert cravings.
Each of these recipes shares that same magic formula: a buttery base, a vibrant fruit center, and a topping that turns golden in the oven.
Pairing/Serving Suggestions
Cherry pie bars aren’t just dessert. They’re an experience. The way you serve them can completely shift the mood, from casual afternoon treat to dressed-up dinner finale. With a few thoughtful touches, you can elevate them without adding extra stress.
Drink Pairings
- Freshly Brewed Coffee: The slight bitterness of coffee balances the sweetness of cherry pie bars beautifully. It creates a grounded, comforting pairing that works any time of day.
- Vanilla Latte or Cappuccino: The creamy milk and soft vanilla notes echo the buttery crust and make each bite feel indulgent.
- Sparkling Rosé: If you’re serving these at a gathering, a chilled sparkling rosé adds brightness and celebration. The subtle bubbles cut through the richness and highlight the fruit flavor.
Side Pairings
- Vanilla Bean Ice Cream: A scoop slowly melting beside warm cherry pie bars turns them into a plated dessert worthy of a restaurant menu.
- Lightly Sweetened Whipped Cream: Soft, airy cream adds contrast without overpowering the cherry filling.
- Fresh Berries: A small handful of raspberries or strawberries on the side enhances the fruit-forward experience and adds visual appeal.
Presentation Ideas
- Dusting of Powdered Sugar: A light sprinkle just before serving makes the bars look delicate and bakery-finished.
- Cut into Clean Squares: Use a sharp knife wiped clean between cuts for precise edges that look polished and professional.
- Serve on a Rustic Wooden Board: For gatherings, arrange cherry pie bars on a wooden serving board with fresh cherries scattered around for an inviting, shareable display.
The way you present cherry pie bars can transform them from simple to unforgettable with almost no extra effort.
Frequently Asked Questions
Can I use homemade cherry filling instead of canned?
Absolutely. Homemade cherry filling often has a fresher flavor and allows you to control sweetness. Just make sure it’s thick enough so the bars set properly after baking.
Why did my cherry pie bars turn out too soft?
This usually happens if they were sliced before fully cooling. The filling needs time to firm up as it rests. Refrigerating them for a short period can also help create cleaner cuts.
Can I double this recipe?
Yes, but you’ll need a larger baking pan or two standard pans. Be mindful that baking time may increase slightly, so watch for golden edges and a set center.
Do cherry pie bars need to be refrigerated?
They can sit at room temperature for a day or two, but refrigeration extends freshness and helps maintain structure, especially in warmer climates.
Can I reduce the sugar?
You can slightly reduce the sugar in the crust if desired, but avoid reducing it too much or the texture may change. The sweetness helps create that tender crumb.
Nutrition Information
Here’s a general nutritional snapshot to give you a better understanding of what you’re enjoying.
Per Serving
- Calories
- Protein
- Carbohydrates
- Sugar
- Fat
- Fiber
Cherry pie bars are meant to be savored. They strike that sweet spot between indulgence and simple pleasure, making every bite feel worth it.
Seasonal and Occasion Variations
One of the reasons cherry pie bars remain so beloved is their flexibility. With small adjustments, they fit nearly every season and celebration.
Spring/Summer
- Fresh Cherry Upgrade: Use fresh, pitted cherries when they’re in season for a brighter, juicier flavor.
- Lemon Zest Addition: Add a touch of lemon zest to the crust for a fresh, sunny note that feels perfect for warm weather gatherings.
Fall
- Spiced Cherry Filling: Stir in a pinch of cinnamon and nutmeg for a cozy twist that aligns with autumn flavors.
- Brown Sugar Crust: Replace part of the granulated sugar with brown sugar to add deeper caramel notes.
Winter
- Dark Chocolate Swirl: Gently swirl melted dark chocolate into the cherry filling for a richer, more decadent winter version.
- Almond Glaze Drizzle: Mix powdered sugar with almond extract and drizzle over cooled bars for a festive finish.
Holiday Ideas
- Valentine’s Day Cutouts: Use heart-shaped cutters to transform cherry pie bars into romantic, shareable treats.
- Fourth of July Platter: Pair with blueberry and cream-based desserts for a red, white, and blue themed dessert spread.
Cherry pie bars adapt effortlessly to the mood of the moment, which is exactly why they never go out of style.
My Recipe Tips
After making cherry pie bars more times than I can count, I’ve learned that the smallest details make the biggest difference. These are the little insights that turn a good batch into one that people talk about long after the last crumb disappears.
- Pro Insight: Don’t rush the creaming process. When butter and sugar are beaten until truly light and fluffy, the texture of your cherry pie bars becomes noticeably softer and more tender. It might take an extra minute or two, but that air you incorporate is what gives the crust its delicate bite instead of a dense, heavy feel.
- Common Mistake to Avoid: Overloading the filling. It’s tempting to add extra cherry pie filling for drama, but too much can cause the bars to become soggy and difficult to slice. Stick to an even layer that fully covers the base without pooling at the edges. Balance is what keeps the structure intact.
- Flavor Enhancement Secret: A tiny pinch of salt sprinkled over the cherry layer before adding the top dough can subtly heighten the fruit flavor. It doesn’t make the bars salty. It simply sharpens the sweetness and makes the cherries taste more vibrant.
- Texture Refinement Tip: Chill the baked cherry pie bars for at least an hour before slicing if you want ultra-clean edges. While they’re delicious at room temperature, a brief chill firms up the layers and creates that bakery-style finish that looks as good as it tastes.
Over time, you’ll find your own rhythm with this recipe. Maybe you’ll prefer them slightly warm with melting ice cream, or perhaps you’ll love them cold straight from the fridge. That flexibility is part of their charm.
Conclusion
Cherry pie bars have a quiet kind of magic. They don’t shout for attention with elaborate decorations or complicated techniques. Instead, they win you over slowly, with buttery layers, glossy cherry filling, and a balance of sweetness that feels just right.
They’re practical enough for weeknights and special enough for celebrations. They travel well, slice cleanly, and invite people back for seconds without hesitation. That’s what makes them more than just another dessert. They create moments around the table.
When you bake cherry pie bars, you’re not just following steps. You’re building layers of flavor, texture, and nostalgia that feel familiar yet exciting every single time. It’s the kind of recipe that earns a permanent spot in your collection because it simply works.
So the next time you’re craving something comforting, something that feels both classic and irresistible, let cherry pie bars be your answer. Bake them, slice them, share them, and watch how quickly they disappear.

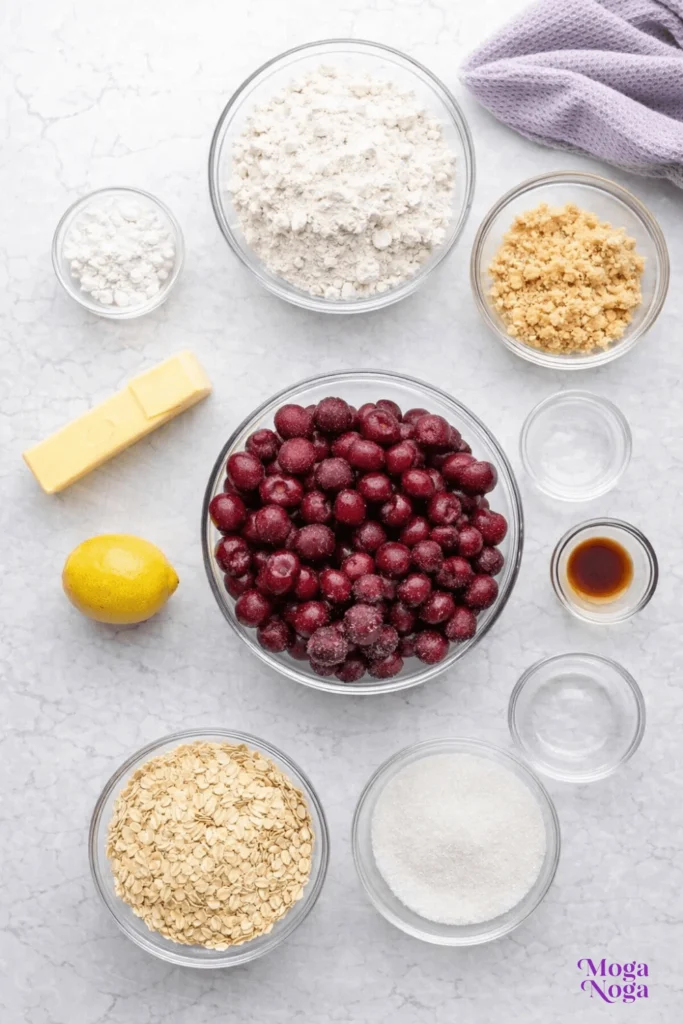
Ingredients
For the crust and topping:
1 cup unsalted butter, softened
1 ¾ cups granulated sugar
4 large eggs
1 teaspoon pure vanilla extract
3 cups all-purpose flour
1 teaspoon baking powder
½ teaspoon salt
For the filling:
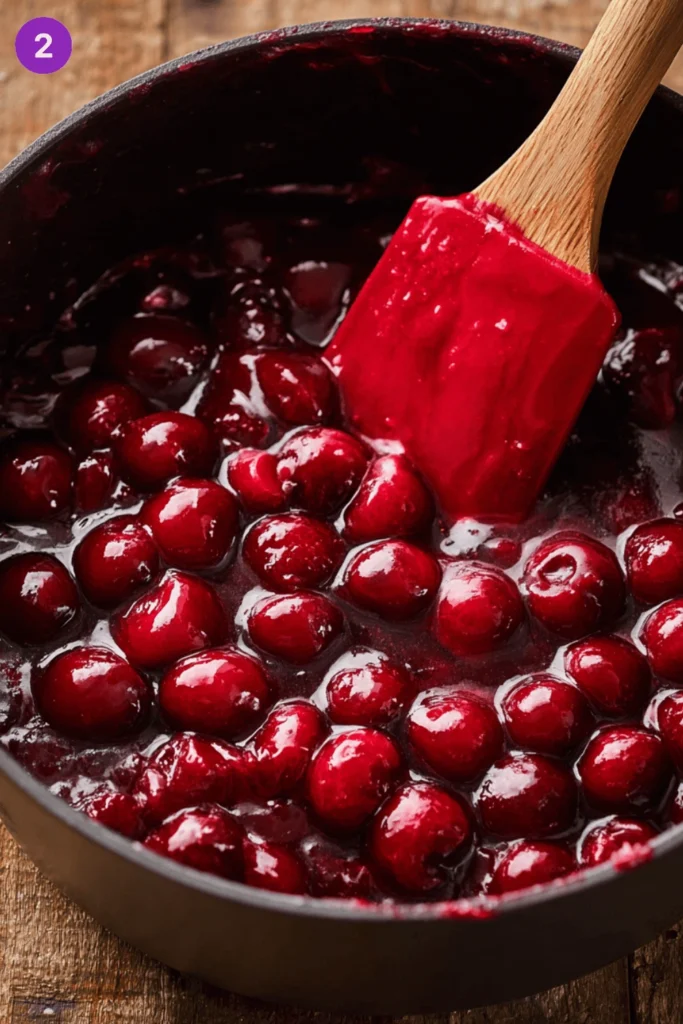
1 can (21 ounces) cherry pie filling
1 cup fresh cherries, pitted and halved (optional, for extra texture)
For the glaze (optional):
1 cup powdered sugar
2 tablespoons milk
½ teaspoon vanilla extract
Instructions
Preheat your oven to 350°F (175°C). Grease and line a 9x13-inch baking pan with parchment paper for easy removal.
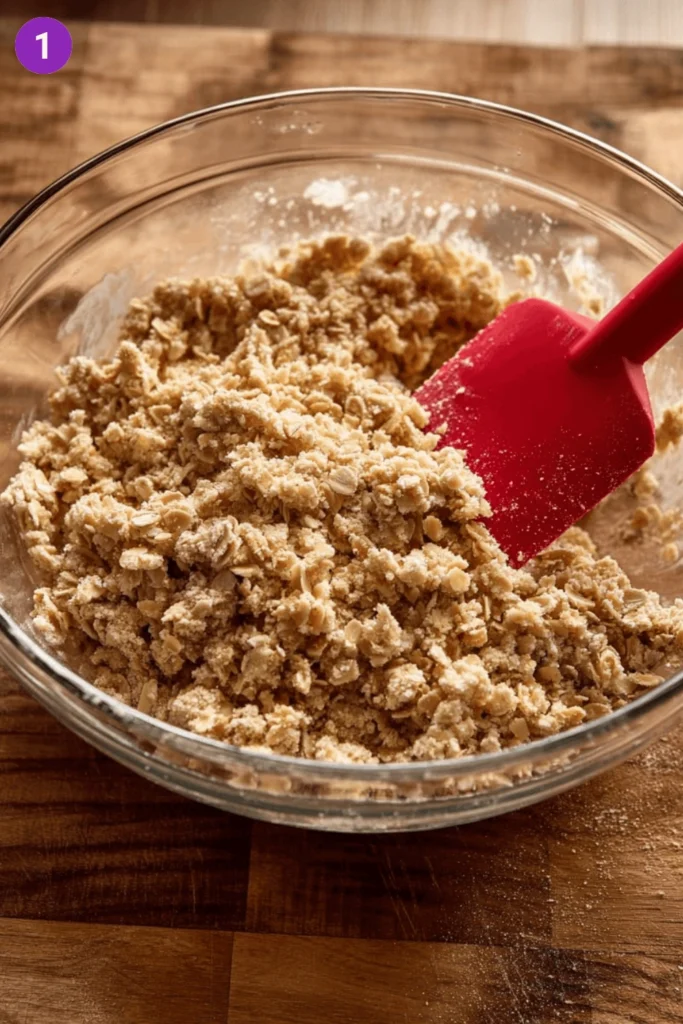
In a large mixing bowl, beat the softened butter and granulated sugar together until light and fluffy, about 3–4 minutes.
Add the eggs one at a time, beating well after each addition. Mix in the vanilla extract until fully combined.
In a separate bowl, whisk together the flour, baking powder, and salt.
Gradually add the dry ingredients to the wet mixture, mixing just until combined. The batter will be thick and spreadable.
Spread about two-thirds of the batter evenly into the prepared baking pan, smoothing it with a spatula.
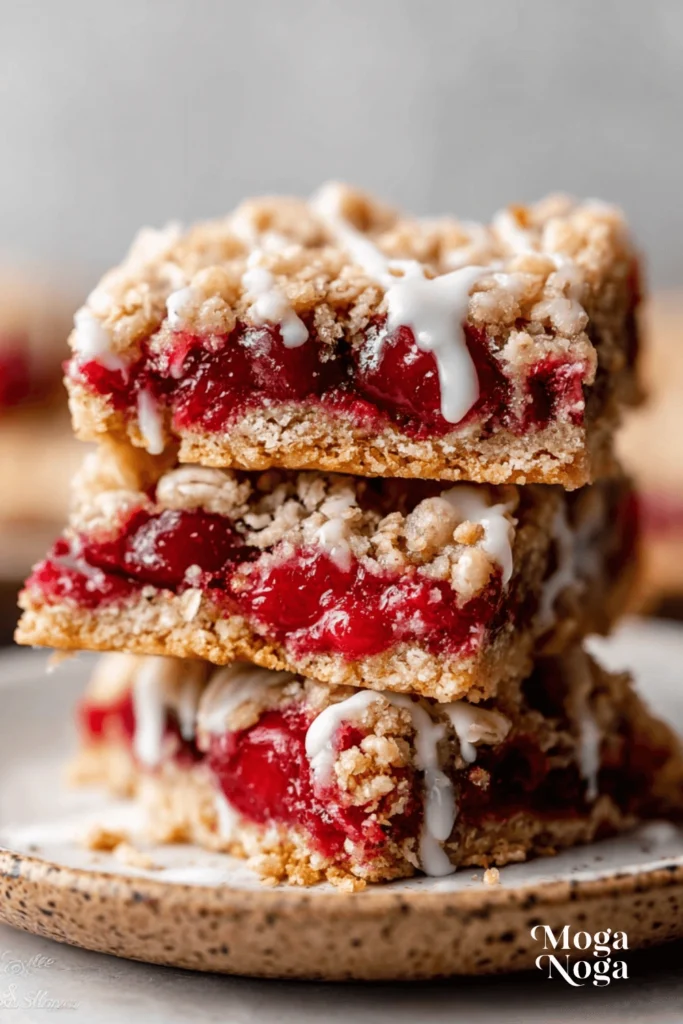
Spoon the cherry pie filling evenly over the batter. If using fresh cherries, sprinkle them over the top for added freshness.
Drop spoonfuls of the remaining batter over the cherry layer, gently spreading to create a rustic, cobbler-style topping.
Bake for 35–40 minutes, or until the top is lightly golden and a toothpick inserted into the crust comes out clean.
Remove from the oven and allow the bars to cool completely in the pan.
If using the glaze, whisk together powdered sugar, milk, and vanilla until smooth. Drizzle over the cooled bars before slicing.
Cut into squares and serve.
