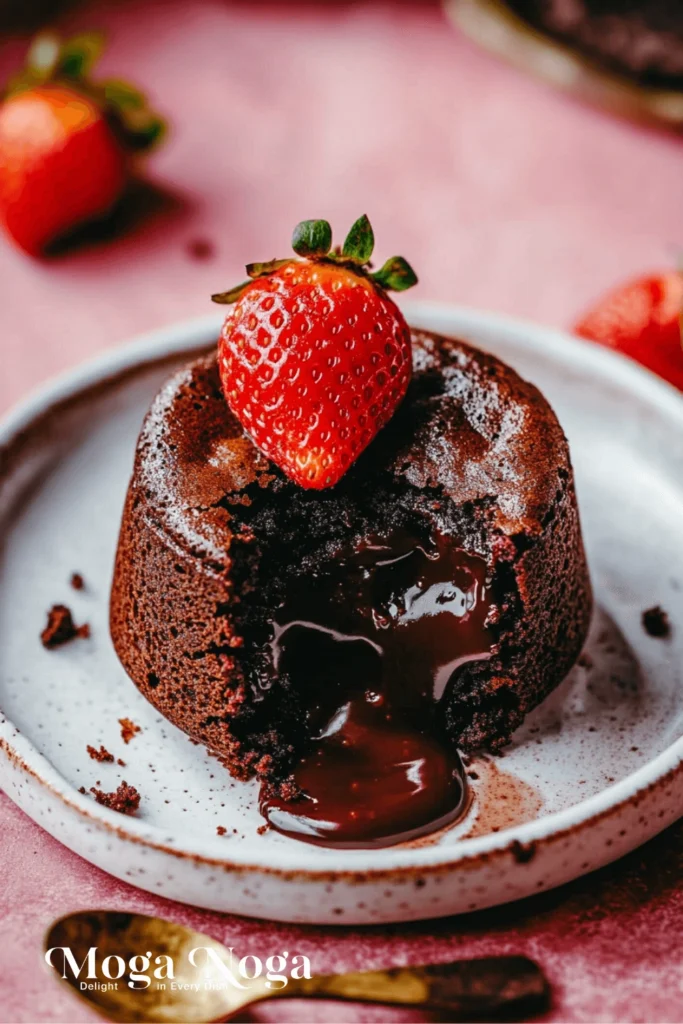
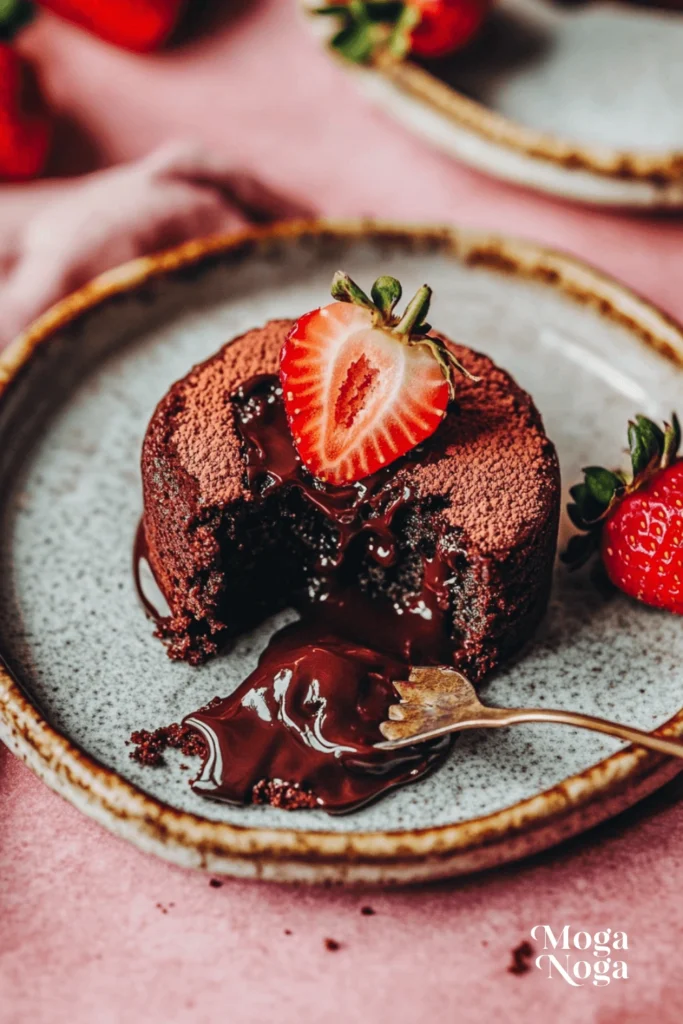
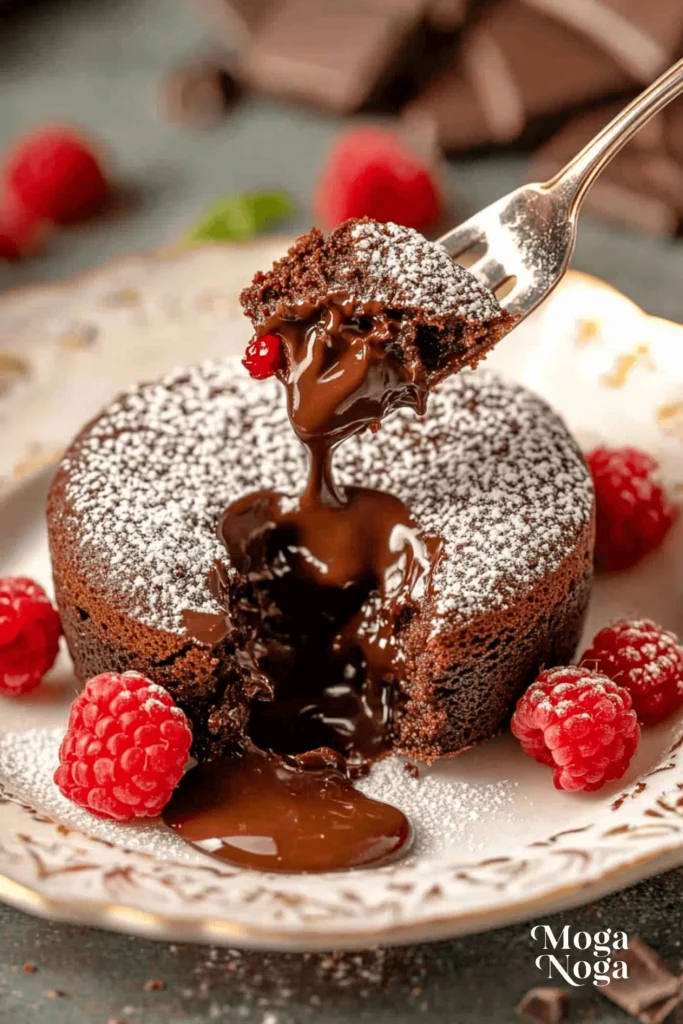
Chocolate lava cake is the dessert that makes you stop mid-bite and smile. It’s rich, warm, and packed with deep chocolate flavor—but the real magic is in that molten center. Slice into one, and you’re rewarded with a flow of silky hot chocolate that never fails to impress. Whether you’ve ordered it at a restaurant or watched someone make it on TV, you know the appeal. What’s even better? It’s way easier to make at home than most people think.
This recipe isn’t just for experienced bakers. Even if you rarely turn on the oven, you can pull this off with just a few ingredients and a couple of bowls. And the best part? It comes together in under 30 minutes. You don’t need a fancy setup; you need a love for chocolate and a little curiosity.
This one fits the bill if you’re looking for a dessert that feels fancy without the fuss. It’s perfect for date nights, dinner parties, birthdays—or, honestly, just a random Tuesday night when you’re craving something warm and indulgent. This article will walk you through every step, offer tips, and help you customize your perfect chocolate lava cake. Let’s dive in.
Table of Contents
Why You’ll Love This Recipe
This isn’t just another chocolate dessert. Chocolate lava cake hits that sweet spot between decadent and comforting. Here’s what makes this recipe a standout:
- It’s quick. You’re looking at less than half an hour from prep to plate.
- Minimal ingredients. You likely have most of them in your kitchen already.
- Impressive presentation. That flowing center gets attention every time.
- Customizable. Swap the filling, adjust the sweetness, or add a twist—it’s flexible.
- Great for small batches. You don’t need to make a dozen. This recipe scales easily.
You don’t need to be a pastry chef to nail this. If you can melt chocolate and stir, you’re already halfway there. Plus, the recipe has a bit of drama in its reveal—cutting into that soft cake and watching the chocolate ooze out is always satisfying. And if you’re serving guests, it’s a guaranteed crowd-pleaser.
Detailed Ingredients and Instructions
Let’s break this down so you know exactly what to expect. The ingredients are simple, but each one plays a role in getting that perfect texture.
The ingredients
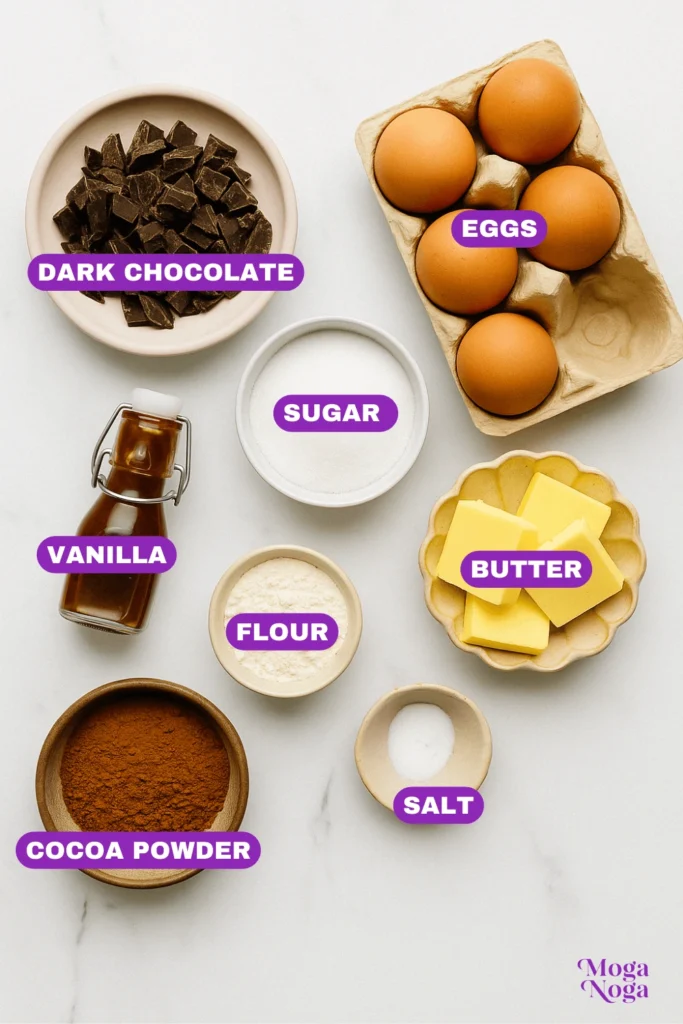
The Chocolate: Use good-quality dark or semi-sweet chocolate. The better the chocolate, the richer the flavor. Skip chocolate chips if you can—they contain stabilizers that keep them from melting properly. Go for baking bars if possible.
The Butter: Unsalted butter is best here so you can control the salt level. Melt it with the chocolate to create that smooth, glossy base.
The Eggs: You’ll need whole eggs plus a few extra yolks. The yolks help thicken and add richness, while the whole eggs provide structure.
The Sugar: Granulated sugar sweetens the mix just enough. You don’t want the cake to be too sweet—it’s all about balance.
The Flour: A little bit of all-purpose flour goes a long way. Too much, and the cake turns out cakey, not molten. Just a few tablespoons are enough.
The Vanilla and Salt: Vanilla adds warmth, and salt brings out the chocolate flavor. Don’t skip either.
Now, the process:
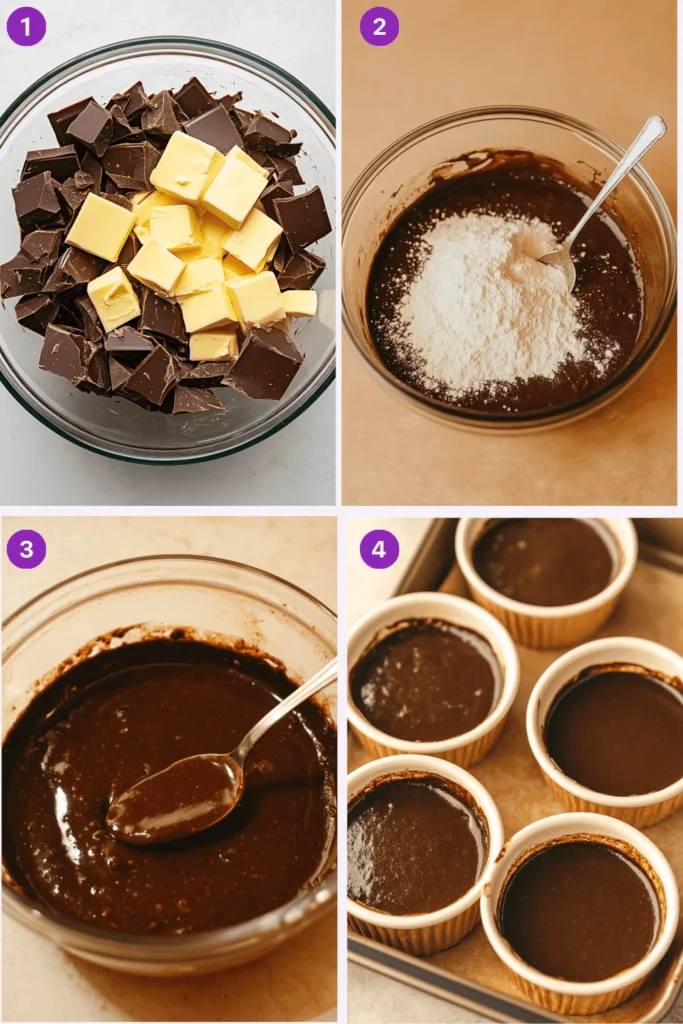
- Step One: Melt chocolate and butter together. You can do this in a double boiler or carefully in the microwave. Stir until smooth.
- Step Two: In another bowl, whisk the eggs, yolks, and sugar until thick and pale. This helps create that soft, airy structure.
- Step Three: Combine the chocolate mixture with the egg mixture. Stir gently to keep the air in.
- Step Four: Fold in the flour, salt, and vanilla. Mix just until incorporated. You don’t want to overdo it.
- Step Five: Grease your ramekins and dust them with cocoa powder. This helps the cakes release easily and adds a touch more chocolate flavor.
- Step Six: Divide the batter evenly into the ramekins and bake.
Here’s the trick: you want the edges set, but the center should still look soft. That’s where the lava lives. Timing is key, and ovens vary, so you might want to test one first if you’re baking for an event.
Tips, Variations, and Storage Options
Once you’ve nailed the basic version, chocolate lava cake becomes a fun recipe to play with. Here’s how to elevate, tweak, and store it without losing that signature gooey texture.
Tips for Success
- Room Temp Eggs: Cold eggs can seize the batter when mixed with warm chocolate. Let them sit out for a bit before using them.
- Grease and Dust Thoroughly: You don’t want to lose any of that cake to the ramekin. A light layer of butter and cocoa powder makes for a clean release and an extra hit of flavor.
- Don’t Overbake: They’re ready when the edges are firm, but the middle jiggles slightly. Overbaking turns the center into cake, not lava.
- Rest After Baking: Let them sit for a minute or two after taking them out of the oven. This helps the cakes set just enough so you can flip them without tearing.
Variations to Try
- Peanut Butter Core: Drop a spoonful of peanut butter in the center before baking. It’ll melt inside and give you that salty-sweet combo.
- Raspberry Filling: Tuck a few fresh or frozen raspberries into the batter for a tart contrast.
- Salted Caramel Twist: Add a small cube of caramel in the center. The result? A double-drip of chocolate and caramel goodness.
- Mocha Flavor: Add a shot of espresso or instant coffee granules to deepen the flavor without overpowering the chocolate.
- Gluten-Free Option: Swap the flour with almond flour or a gluten-free baking mix. It slightly changes the texture but still works beautifully.
How to Store Chocolate Lava Cake
If you have leftovers (rare, but it happens), here’s what to do:
- Refrigerate: Let the cakes cool completely, then wrap them tightly. They’ll keep in the fridge for a few days.
- Reheat: The best way to bring them back to life is by microwaving for a few seconds. Ten to fifteen seconds is enough to get that center flowing again.
- Freeze for Later: You can freeze the unbaked cakes in their ramekins. Cover tightly and freeze. When you’re ready to bake, let them sit at room temp for about twenty minutes before putting them in the oven. Add a few extra minutes to baking, and they’ll turn out great.
Equipment Needed
You don’t need anything fancy to make chocolate lava cake, but a few tools will make things smoother and more consistent. Here’s what you should have on hand:
- Ramekins or Custard Cups: These are essential. Four-ounce to six-ounce sizes work best. Ceramic or glass are both fine.
- Mixing Bowls: One for the chocolate and butter, another for the eggs and sugar.
- Whisk or Electric Mixer: A hand whisk works, but an electric mixer makes the egg-sugar mixture extra fluffy with less effort.
- Spatula: This is for folding the ingredients gently without losing air.
- Baking Sheet: This makes placing ramekins in and out of the oven easier.
Related Recipes
If chocolate lava cake excites you, you might love exploring these rich, easy-to-make dessert options that hit similar notes of indulgence, warmth, and comfort.
- Chocolate Mousse Cake: A smooth, airy upgrade for chocolate lovers. Layers of rich mousse and soft cake come together in a light but decadent dessert that melts in your mouth—no lava, just pure velvet.
- Skillet Brownies: Chewy edges, soft centers, and no slicing required. Bake it in a cast iron pan and serve warm with ice cream for a rustic, crowd-pleasing dessert.
- Flourless Chocolate Cake: Dense, rich, and naturally gluten-free. This cake is more solid than lava cake but just as chocolate-forward. Great with a dusting of cocoa or a drizzle of ganache.
- Chocolate Soufflé: Taller and more technical, but the airy texture and deep flavor are well worth it. A significant next step if you’re feeling confident after mastering lava cake.
- Mini Cheesecake Bites: It’s not chocolate, but it’s just as addictive. Easy to make ahead and customize with toppings like fruit, chocolate chips, or caramel sauce.
Pairing/Serving Suggestions
Chocolate lava cake is already a star on its own, but pairing it with the right flavors or textures can take the whole experience to another level. Whether you’re aiming for contrast, balance, or just extra indulgence, here are a few ways to serve it up:
- Ice Cream is a Must: Warm cake meets ice cream—it’s the classic combo for a reason. Vanilla is a safe bet, but don’t stop there. Try salted caramel, espresso, or cherry ice cream to shake things up. The creamy coldness balances the richness of the chocolate perfectly.
- Fresh Berries: Raspberries, strawberries, or blueberries add a tart pop that cuts through the sweetness. The bright colors look great on a plate beside that deep, rich cake.
- Whipped Cream or Crème Fraîche: Soft, airy whipped cream adds lightness. If you want a more grown-up twist, crème fraîche offers a tangy counterpoint that keeps the dessert from feeling too heavy.
- Espresso or Coffee: A small shot of espresso or a strong cup of black coffee pairs beautifully with chocolate lava cake. The bitterness of the coffee makes the sweetness of the dessert stand out even more.
- Wine or Liqueur: If you’re serving this to adults, try it with a dessert wine like port, a fruity red like Zinfandel, or a splash of Bailey’s or Grand Marnier on the side. The alcohol enhances the chocolate and makes it feel extra special.
- Extra Sauce: Drizzle the plate with raspberry sauce, caramel, or melted chocolate for added drama and flavor. It’s all about that wow factor.
Frequently Asked Questions
Can I make chocolate lava cake in advance?
Yes, you can prep the batter and pour it into greased ramekins. Cover and refrigerate for a few hours or even overnight. Just bring them to room temperature for about twenty minutes before baking. If baking straight from the fridge, add an extra minute or two in the oven.
What’s the best type of chocolate to use?
Go for high-quality chocolate that’s around sixty to seventy percent cacao. Baking bars melt more smoothly than chocolate chips, which often contain stabilizers that prevent proper melting.
Can I make it without ramekins?
A muffin tin can work in a pinch if you don’t have ramekins. Be sure to grease each cup well and watch the baking time—it’ll likely be shorter since the cakes are more miniature.
How do I know when it’s done?
The edges should be set and pulled slightly from the sides, while the center should still look soft and jiggly. A toothpick inserted into the edge should come out clean, but the middle should not be fully set.
Is there a vegan version?
Absolutely. You can use dairy-free butter, plant-based milk, and an egg substitute like flax or commercial egg replacers. Just note that texture may vary slightly, and getting that lava consistency might take a few tests.
Can I freeze-baked lava cakes?
Yes, though they’re best fresh. If you do freeze them after baking, let them cool completely first. Wrap tightly and store in a freezer-safe bag or container. Reheat gently in the microwave or oven before serving.
Nutrition Information
Here’s a general idea of what you get per serving when you enjoy one standard-sized chocolate lava cake. Keep in mind that this will vary slightly depending on ingredients and portions.
- Calories: Around four hundred to four hundred fifty per cake
- Protein: Roughly six grams
- Carbohydrates: About forty grams
- Sugar: Around twenty-five grams
- Fat: Approximately twenty-four grams
- Saturated Fat: About twelve grams
- Fiber: Between two and three grams
These cakes are indulgent, but they’re also portion-controlled. One small cake delivers serious flavor and satisfaction. You can also cut back slightly on sugar or butter if you want a lighter version, though the classic version is all about richness.
Seasonal and Occasion Variations
Chocolate lava cake is one of those desserts that works year-round. You can tailor it to any holiday, season, or special event with a few tweaks. Here’s how to make it feel right, no matter the occasion.
Winter: Cozy and Rich
Add a dash of cinnamon or nutmeg to the batter for a warming touch. You can also serve it with peppermint ice cream or crushed candy canes on top for a festive holiday vibe. A drizzle of dark chocolate ganache over the top takes it to holiday-dessert-showstopper territory.
Spring: Light and Fruity
Pair your cakes with macerated strawberries or a tangy rhubarb compote. The brightness of the fruit balances the richness of the cake. You can also experiment with floral hints—try a touch of rose or orange blossom water in the batter for a subtle twist.
Summer: Fresh and Cool
Serve with a scoop of fruity gelato—think raspberry, mango, or passionfruit. Whipped coconut cream and toasted coconut flakes add a tropical spin. For outdoor parties, bake them in muffin tins for easy, handheld servings.
Fall: Deep Flavors and Spice
Pumpkin spice lovers take note. Mix a spoonful of pumpkin puree and a pinch of pumpkin pie spice into the batter for a seasonal flavor profile. You can experiment with brown butter for a nuttier, more profound richness that pairs well with autumn flavors.
Special Occasions
For Valentine’s Day, shape your cakes in heart molds and sprinkle them with powdered sugar and edible rose petals. Top each cake with a lit candle and a scoop of the birthday person’s favorite ice cream for birthdays. For a dinner party, serve the cakes in individual ramekins with a small glass of dessert wine or espresso on the side. Instant wow.
My Recipe Tips
Over time, I’ve found a few tricks that take chocolate lava cake from good to “how did you make this?” level. These small details make a difference.
- Test One First: If baking for guests or a big event, always test-bake one cake first. Ovens vary, and so does timing. That single test helps you get a feel for the moment when the center is still molten and the edges are set.
- Let the Batter Rest: Suppose you’ve got a few extra minutes; letting the batter sit (even just ten or fifteen minutes) before baking can improve the texture slightly. It allows the ingredients to hydrate more evenly, which leads to a smoother cake.
- Serve Immediately: Chocolate lava cake waits for no one. It’s best right out of the oven while the center is still molten. If you’re serving a group, have everything else—plates, toppings, coffee—ready before they come out.
- Use the Right Cocoa for Dusting: Instead of flouring your ramekins, use cocoa powder. It adds flavor and prevents the cakes from picking up a white coating when you turn them out.
- Grease the Ramekins Generously: Don’t skimp on the butter or cooking spray. You want the cakes to release easily so the lava effect shows. A stuck cake is still delicious but won’t have that signature flow.
- Cool, Just a Minute or Two: It could fall apart if you try to flip the cake too soon. Wait a minute or two after baking; it’ll hold together better while keeping the center molten.
Conclusion
Chocolate lava cake is one of those recipes that feels like a restaurant-level treat, but you don’t need fancy skills or expensive equipment to make it at home. With just a few staple ingredients, a ramekin, and the right timing, you get that unbeatable mix of warm cake and flowing chocolate that never fails to impress.
Whether making it for yourself on a quiet night or serving it to a table full of guests, this dessert brings drama and comfort in equal measure. It’s flexible enough to suit every season, easy to pull off on a weeknight, and special enough for big celebrations.
Give it a try, experiment with your twists, and enjoy the magic of molten chocolate at home. Check out my other dessert recipes for more inspiration if you love this. There’s always room for one more indulgent favorite in your rotation.

Ingredients
1/2 cup unsalted butter
6 oz semi-sweet or bittersweet chocolate (chopped)
1 cup powdered sugar
2 large eggs
2 large egg yolks
1 teaspoon vanilla extract
1/4 cup all-purpose flour
Pinch of salt
Butter and cocoa powder (for greasing the ramekins)
Vanilla ice cream or whipped cream (for serving, optional)
Instructions
Preheat the oven: Preheat your oven to 425°F (220°C). Grease 4 ramekins with butter and dust them with cocoa powder to prevent the cakes from sticking.
Melt the chocolate and butter: In a heatproof bowl, melt the butter and chopped chocolate together. You can do this in a microwave in 20-second intervals or by using a double boiler on the stove. Stir until smooth and combined.
Mix the batter: Once the chocolate and butter are melted and cooled slightly, whisk in the powdered sugar until smooth. Add the eggs and egg yolks, one at a time, whisking until fully incorporated. Stir in the vanilla extract. Finally, fold in the flour and a pinch of salt.
Pour the batter into ramekins: Divide the batter evenly between the prepared ramekins. The batter should fill about 3/4 of each ramekin.
Bake the cakes: Place the ramekins on a baking sheet and bake for 12-14 minutes, or until the edges are firm but the center is soft and slightly jiggly. The top should look set and slightly cracked.
Serve: Let the cakes cool for 1 minute before carefully running a knife around the edges to loosen. Invert the ramekins onto serving plates and gently lift them off. Serve immediately with vanilla ice cream or whipped cream on the side for an indulgent treat.
