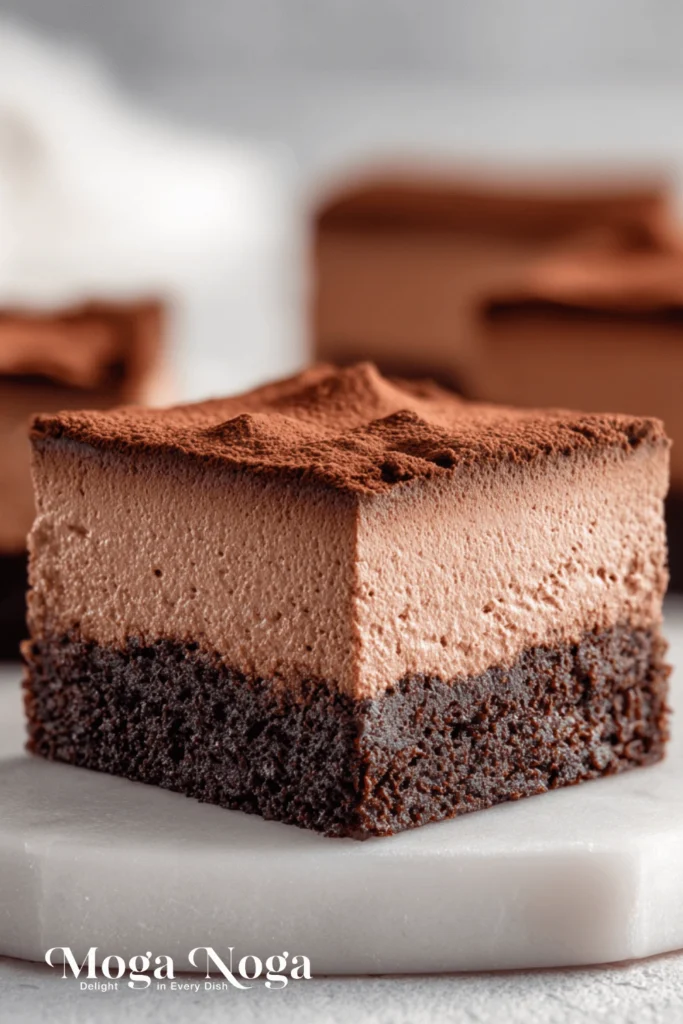
Chocolate Mousse Brownies are more than dessert—they’re a rich, melt-in-your-mouth fantasy. Fudgy brownie base meets silky chocolate mousse in every decadent bite. If you’re craving something indulgent, elegant, and impossible to resist, this recipe delivers pure chocolate bliss.
Table of Contents
Why You’ll Love This Recipe
- Two desserts in one: These Chocolate Mousse Brownies combine the richness of traditional brownies with the light elegance of chocolate mousse, delivering the best of both worlds in one bite.
- Perfect for special occasions: Whether it’s a birthday, Valentine’s Day, or a holiday dinner, this layered dessert stands out on any dessert table.
- Make-ahead friendly: The mousse needs time to chill and set, making this the ideal dessert to prepare in advance.
- Easy to customize: You can adapt the mousse flavor, add toppings like berries or crushed cookies, or even turn the whole thing into bite-sized brownie cups.
- Restaurant-quality results at home: The combination of textures and flavors creates a dessert that feels elevated and impressive, but it’s surprisingly approachable.
Detailed Ingredients and Instructions
To achieve the perfect Chocolate Mousse Brownies, each step should be approached with care—from choosing the right chocolate to layering with finesse. Here’s what you need to know before you begin.
Step 1: Crafting the Brownie Base
Start with a rich brownie recipe that balances chewiness with a slightly underbaked center. Opt for high-quality cocoa powder or melted dark chocolate to maximize depth. Butter, rather than oil, adds moisture and richness, while brown sugar enhances the fudgy texture. Don’t overmix—stop once the ingredients are just combined. This keeps the brownies dense and chewy instead of cakey.
Once the batter is poured into your pan, use a spatula to level it out. A lined or greased pan is essential for clean removal later. Bake until the edges are firm but the center is slightly soft when gently pressed. That underbaked center will firm up as it cools, giving you that irresistible fudgy bite.
Step 2: Cooling is Key
Allow the brownies to cool completely before adding the mousse. This is non-negotiable. If the base is warm, the mousse will melt and ruin the texture. You can speed up the process by chilling the pan in the refrigerator for 20–30 minutes after it’s reached room temperature.
Step 3: Making the Mousse Layer
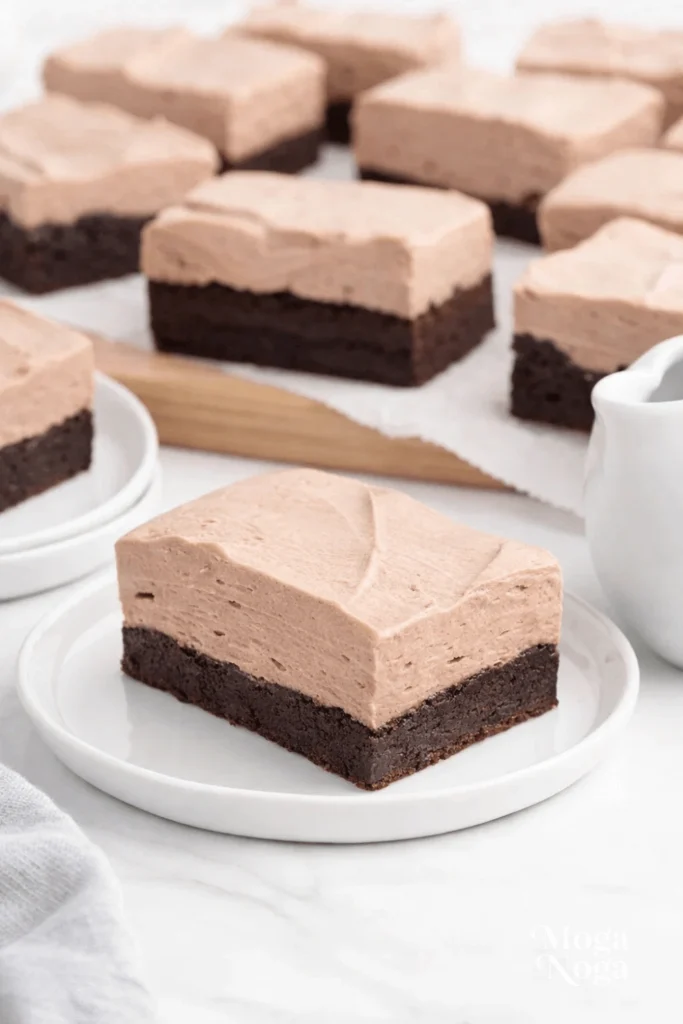
The mousse should be silky, airy, and stable enough to slice. Melted chocolate is the star here—choose dark or semi-sweet chocolate with a cocoa content between 60 and 70 percent. Whipped cream gives the mousse its signature lightness, and folding it into the cooled melted chocolate is what creates that airy texture.
Some mousse recipes include egg yolks or gelatin for stability, especially if the dessert needs to sit out for longer periods. For this recipe, a basic stabilized whipped cream and melted chocolate combo does the trick without making the process overly complicated.
Use a gentle folding motion to combine the whipped cream and chocolate, being careful not to deflate the mixture. Once it’s ready, pour it over the brownie base and smooth the top with an offset spatula. Refrigerate for at least 3 hours—or overnight for best results.
Step 4: Slicing and Serving
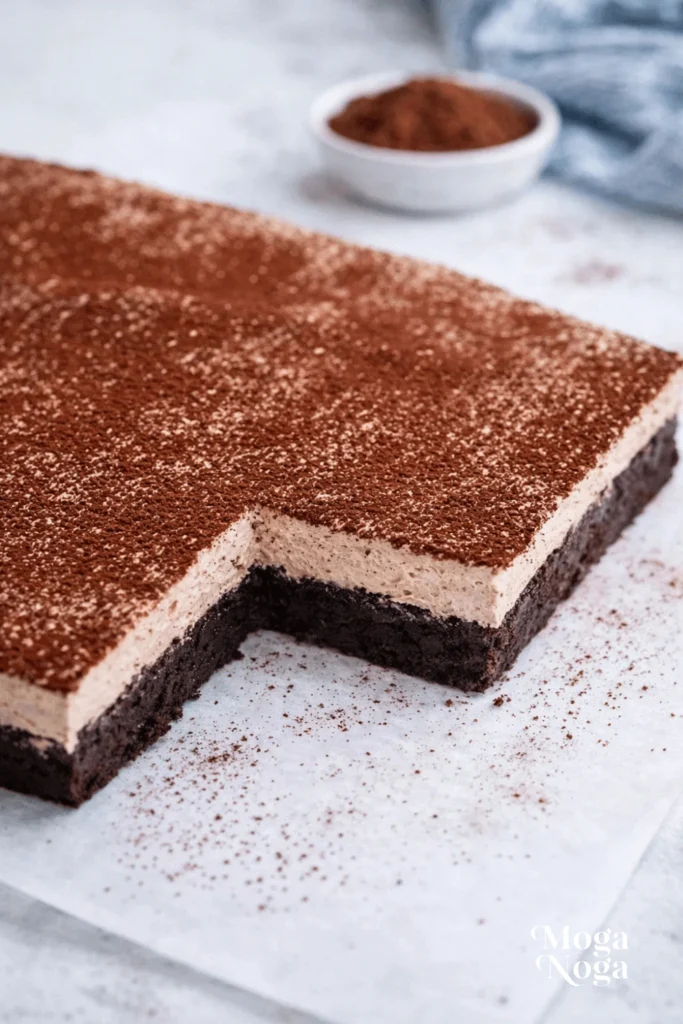
To get clean slices, use a sharp knife dipped in hot water and wiped dry between each cut. This helps slice through the mousse without dragging or crumbling the brownie layer. For extra flair, dust the tops with cocoa powder, shaved chocolate, or a few flakes of sea salt right before serving.
Tips, Variations, and Storage Options
Pro Tips for Success
To make the most out of your Chocolate Mousse Brownies, a few smart baking tricks can go a long way. First, always use room-temperature eggs and butter for the brownie batter. This ensures a smoother texture and better emulsification. When making the mousse, make sure the melted chocolate is fully cooled before folding in the whipped cream—this prevents the cream from melting or curdling.
Another key tip is to refrigerate the entire dessert long enough. The mousse needs time to firm up so that it slices neatly and holds its shape. Don’t skip this part, even if you’re tempted to dig in early. If you’re planning to serve them the next day, cover the pan tightly with plastic wrap to avoid the mousse picking up any fridge odors.
Flavor Variations to Try
Chocolate Mousse Brownies are incredibly adaptable, so don’t hesitate to experiment once you’ve nailed the basic version.
- Mint Chocolate Mousse Brownies: Add a few drops of peppermint extract to the mousse for a refreshing twist that’s perfect for the holidays.
- Peanut Butter Swirl Brownies with Chocolate Mousse: Before baking, swirl in a few spoonfuls of creamy peanut butter into the brownie batter. Top with your usual mousse for a salty-sweet combo.
- Espresso Chocolate Mousse Brownies: Mix in a teaspoon of instant espresso powder into the brownie batter to enhance the chocolate flavor and add a subtle coffee undertone.
- Berry-Topped Chocolate Mousse Brownies: Add fresh raspberries or strawberries on top of the mousse just before serving. Their tartness adds brightness and balances the richness.
Texture Variations
If you want a crunchier bite, fold chopped nuts (like walnuts or pecans) into the brownie batter. Craving something creamy inside the brownie itself? Add chocolate chunks or dollops of Nutella before baking for a gooey surprise in every bite.
Storage and Freezing Instructions
These brownies are ideal for prepping ahead. Store them in an airtight container in the fridge for up to five days. If you’re making a larger batch or saving some for later, you can freeze them too. Just place the cut brownies in a single layer on a tray to freeze for one hour. Then transfer them to a freezer-safe bag or container.
When ready to enjoy, thaw in the fridge overnight. The mousse may lose a little of its fluffiness after freezing, but the flavor remains intact. Avoid microwaving to thaw—always let them come to temperature slowly.
Equipment Needed
Making Chocolate Mousse Brownies doesn’t require any fancy gadgets, but a few reliable tools make the process smoother and more enjoyable:
- 9×9-inch square baking pan: The ideal size for thick, layered brownies with plenty of structure for slicing.
- Electric mixer or hand whisk: For whipping cream into stiff peaks for the mousse layer.
- Heatproof bowl: Essential for melting chocolate safely using a double boiler or microwave.
- Offset spatula: Helps spread the mousse layer evenly across the cooled brownies.
- Sharp chef’s knife: For clean cuts that preserve the mousse layer without dragging.
Optional but helpful tools include parchment paper for easy brownie removal, a cooling rack, and a silicone spatula for gently folding the mousse mixture.
Related Recipes
If Chocolate Mousse Brownies have won your heart, you’ll likely enjoy these other crowd-pleasers that share similar textures or themes:
- Fudge Frosted Brownies: Classic brownies topped with a rich, creamy fudge frosting. Perfect for those who love thick toppings but want a firmer bite than mousse.
- Easy Fudgy Chocolate Brownies: Ultra rich brownies with crackly tops and irresistibly gooey centers made with simple pantry ingredients and baked to deep chocolate perfection.
- Triple Chocolate Layer Cake: For serious chocolate lovers, this cake features layers of chocolate sponge, ganache, and mousse.
- Peanut Butter Protein Bars: Chewy, satisfying bars packed with creamy peanut butter and protein-rich ingredients—perfect for a post-workout boost or a quick on-the-go snack. No baking required.
- Salted Caramel Brownie Bites: Rich mini brownies topped with a swirl of caramel and a pinch of sea salt. Ideal for parties or gifting.
Each of these recipes complements the rich, velvety notes of Chocolate Mousse Brownies but brings its own texture and flair to the table.
Pairing/Serving Suggestions
While Chocolate Mousse Brownies shine beautifully on their own, pairing them with the right accompaniments can elevate the experience and make your dessert table unforgettable. Here are a few creative and crowd-pleasing ideas:
Drinks to Pair With
The rich chocolate layers in these brownies call for beverages that complement or contrast the intensity of the flavors.
- Coffee or Espresso: A strong, black coffee or a rich espresso brings out the depth of the chocolate without overwhelming your palate. It’s a classic café-style pairing that never fails.
- Vanilla or Caramel Latte: If you’re enjoying your dessert as an afternoon treat, a sweet and creamy latte can balance the cocoa intensity and create a warm, comforting combo.
- Milkshakes or Cold Brew: For summer parties, try pairing your brownies with a chilled mocha milkshake or a creamy cold brew over ice.
Dessert Pairings
Want to serve multiple sweets together? Chocolate Mousse Brownies work well alongside:
- Fresh Fruit Salad: A medley of berries, citrus, or melon provides a refreshing contrast to the dense, chocolaty layers.
- Mini Cheesecakes: Offering a tangy, creamy bite, mini cheesecakes balance out the richness of the brownies while keeping the dessert spread elegant.
- Ice Cream: A scoop of vanilla bean, salted caramel, or raspberry sorbet adds a cool, smooth element and enhances the brownies’ flavor. Serve à la mode for an irresistible treat.
Occasion-Based Serving Ideas
These brownies aren’t just delicious—they’re versatile. You can cut them into small squares for a buffet or layer them into parfait cups with whipped cream and berries for a more refined dessert presentation.
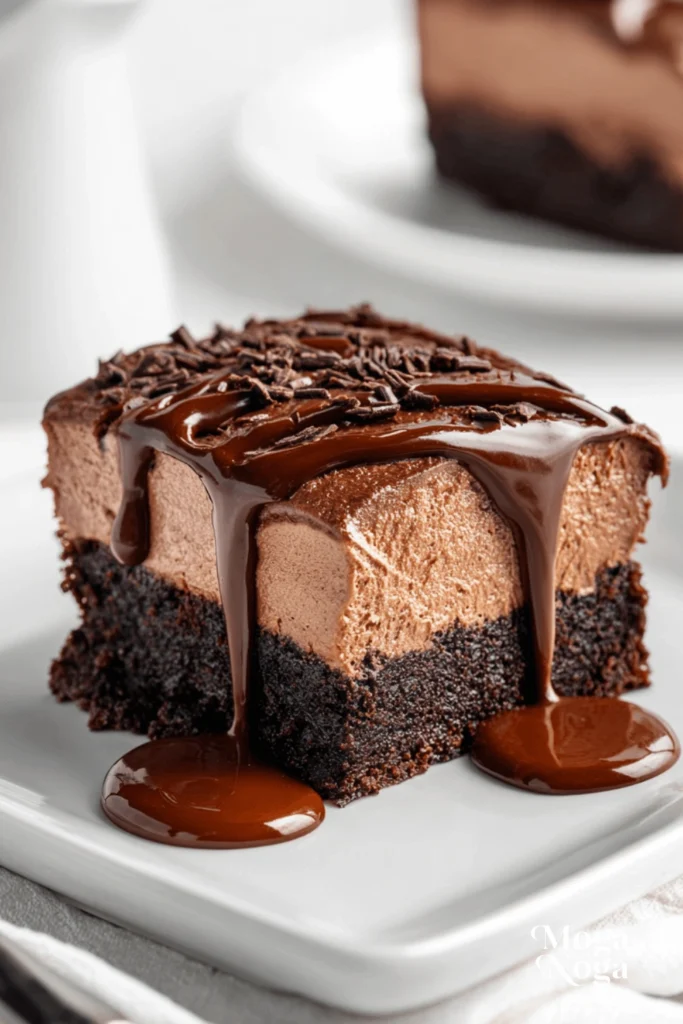
For birthdays or special events, add a drizzle of ganache or chocolate sauce and top with edible gold flakes or chocolate curls for a luxurious finish.
At casual gatherings, try serving them in paper cupcake liners or individual ramekins. Not only does it make cleanup easier, but it also keeps the servings neat and portable.
Frequently Asked Questions
Can I make Chocolate Mousse Brownies ahead of time?
Yes! In fact, they taste even better after a few hours in the fridge. The mousse sets properly, the flavors meld, and slicing becomes easier. You can make them the night before and store them covered in the fridge.
How long should I refrigerate them before serving?
A minimum of three hours is ideal, but overnight refrigeration gives the best results. The mousse needs time to firm up and develop its signature texture.
Can I use boxed brownie mix?
Absolutely. While homemade brownies offer more control over flavor and texture, a high-quality boxed mix can save time and still deliver great results. Just make sure to let the brownies cool completely before adding the mousse layer.
What kind of chocolate should I use for the mousse?
Choose semi-sweet or dark chocolate with a cocoa content between 60 and 70 percent. Avoid milk chocolate, as it can make the mousse too sweet and soft. Quality chocolate will make a big difference in taste and texture.
How do I get clean cuts without messing up the mousse?
Use a sharp knife dipped in hot water and wiped clean between each slice. This method helps you cut through the mousse cleanly without dragging it or squishing the layers.
Can I make it dairy-free?
Yes, you can use dairy-free whipped topping and a dark chocolate that contains no milk. For the brownie base, substitute butter with a dairy-free margarine or coconut oil. Make sure to read labels carefully if you’re preparing for someone with allergies.
Can I freeze them?
Yes, they freeze well for up to two months. Just wrap the brownies individually in plastic wrap and store them in a freezer-safe bag. Thaw in the refrigerator overnight before serving. While the texture of the mousse might slightly change, the flavor remains just as delicious.
Nutrition Information
While Chocolate Mousse Brownies are definitely an indulgence, knowing the nutritional breakdown can help you fit them into a balanced lifestyle or plan accordingly for guests with dietary goals.
Per serving (1 square, assuming 12 servings):
- Calories: Approx. 320
- Total Fat: 22g
- Saturated Fat: 13g
- Carbohydrates: 29g
- Sugar: 20g
- Protein: 4g
- Fiber: 2g
Please note that values will vary depending on the specific ingredients you use—such as chocolate type, cream fat content, or whether you add nuts or toppings. For a lighter version, you can reduce sugar in the brownie layer or use whipped coconut cream instead of heavy cream.
Seasonal and Occasion Variations
Chocolate Mousse Brownies are easy to adapt for any season or special occasion. With a few tweaks in flavor or decoration, they can become the star dessert at every holiday table or seasonal gathering.
- Spring & Easter: Add a citrus twist by mixing orange zest into the brownie batter or garnishing the top with pastel-colored chocolate shavings or candy eggs. Serve with fresh berries for a vibrant finish.
- Summer Celebrations: Top each brownie with a dollop of whipped cream and a fresh cherry, strawberry slice, or raspberry. Chill well before serving to offer a cool, refreshing treat. Mini brownie cups served in cupcake liners also work great for picnics or barbecues.
- Fall and Thanksgiving: Infuse warm spices like cinnamon or nutmeg into the brownie base for cozy flavor notes. Top with crushed pecans or a caramel drizzle for a harvest-inspired twist. A dusting of cinnamon-sugar or a chocolate leaf can make the presentation seasonal and festive.
- Winter Holidays: Add peppermint extract to the mousse and top with crushed candy canes. Or, incorporate a hint of espresso in the brownie base and garnish with a dusting of powdered sugar to mimic snow. They pair beautifully with hot cocoa or mulled wine.
- Valentine’s Day or Anniversaries: Cut into heart shapes using a cookie cutter and top with chocolate-dipped strawberries or rose petals. Serve on a platter with wine or champagne for a romantic dessert experience.
- Birthday Parties or Celebrations: Drizzle with white chocolate or colorful glaze and add sprinkles or edible glitter. You can even write names or numbers using piped frosting or melted chocolate.
My Recipe Tips
Over the years of experimenting in the kitchen, here are a few of my go-to pro tips to help you master Chocolate Mousse Brownies:
- Use parchment paper: Always line your baking pan with parchment, leaving an overhang for easy removal. It prevents sticking and gives you clean edges for cutting.
- Don’t rush the mousse: Let the melted chocolate cool fully before folding in the whipped cream. This keeps the mousse from separating or becoming grainy.
- Stabilize the whipped cream if needed: For longer-lasting mousse, especially in warmer settings, stabilize your whipped cream using a teaspoon of gelatin or powdered sugar before folding into the chocolate.
- Use quality chocolate: The mousse only has a few ingredients, so the flavor of your chocolate really stands out. Choose something rich and smooth for the best taste and texture.
- Always refrigerate before slicing: Give the mousse enough time to set properly. For best presentation, cut just before serving and clean the knife between each slice.
- Make it your signature: Once you’ve mastered the base recipe, start experimenting. Try hazelnut chocolate, mocha mousse, or even a layer of caramel between the brownie and mousse for your own spin.
Conclusion
Chocolate Mousse Brownies aren’t just a dessert—they’re a celebration of texture, flavor, and pure indulgence. From their rich, fudgy base to the dreamy, airy mousse on top, each bite is a delicious contrast of comfort and elegance. Whether you’re baking for a party, holiday, or just a cozy night in, these brownies are sure to leave an impression.
With endless variations, easy make-ahead potential, and restaurant-worthy results, this recipe is a must-have in any dessert lover’s rotation. So go ahead—whip up a batch, savor every bite, and don’t be surprised when they disappear faster than you can say “Chocolate Mousse Brownies.”
If you loved this recipe, make sure to explore more of our rich, layered desserts and easy baking favorites. There’s always something sweet waiting for you in the kitchen!

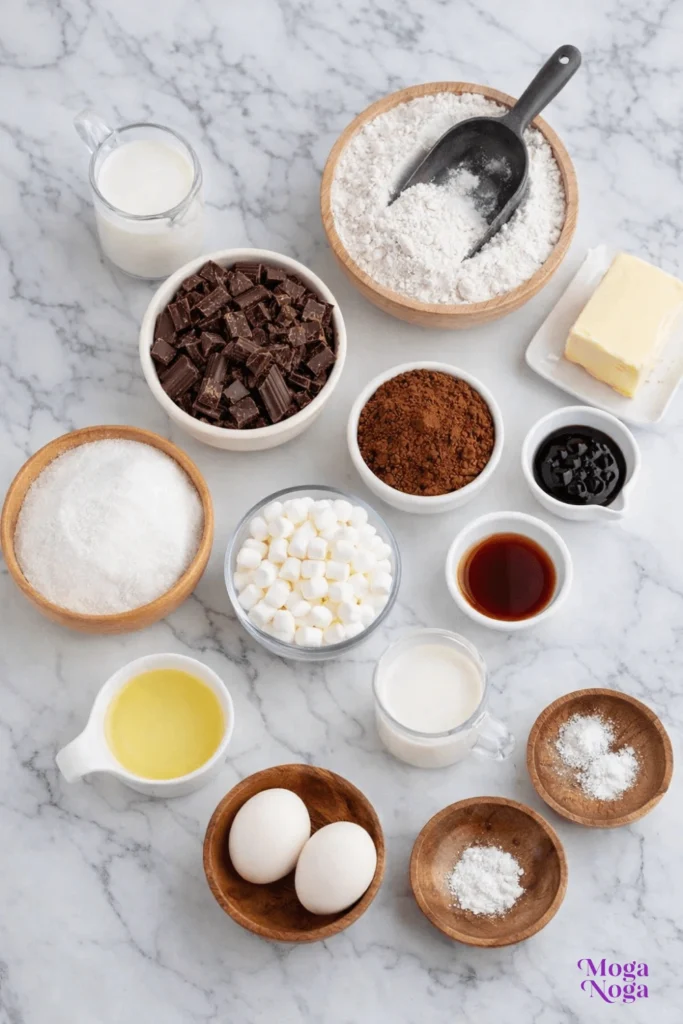
Ingredients
Brownie base
½ cup unsalted butter, melted
1 cup granulated sugar
2 large eggs
1 teaspoon vanilla extract
⅓ cup unsweetened cocoa powder
½ cup all-purpose flour
¼ teaspoon salt
¼ teaspoon baking powder
Chocolate mousse
1 cup heavy whipping cream, cold
½ cup semi-sweet chocolate chips, melted and cooled
2 tablespoons powdered sugar
½ teaspoon vanilla extract
Optional topping
Chocolate shavings or cocoa powder
Instructions
Preheat your oven to 350°F (175°C). Line an 8×8-inch baking pan with parchment paper.
In a bowl, whisk melted butter and sugar until smooth. Add eggs and vanilla extract, mixing well.
Stir in cocoa powder, flour, salt, and baking powder until just combined.
Pour the brownie batter into the prepared pan and spread evenly.
Bake for 20–25 minutes, until set with slightly fudgy centers. Let cool completely.
To make the mousse, beat the cold heavy cream with powdered sugar and vanilla until soft peaks form.
Gently fold the melted chocolate into the whipped cream until smooth and fluffy.
Spread the chocolate mousse evenly over the cooled brownies.
Refrigerate for at least 1 hour to set.
Garnish with chocolate shavings or a light dusting of cocoa powder before slicing and serving.
