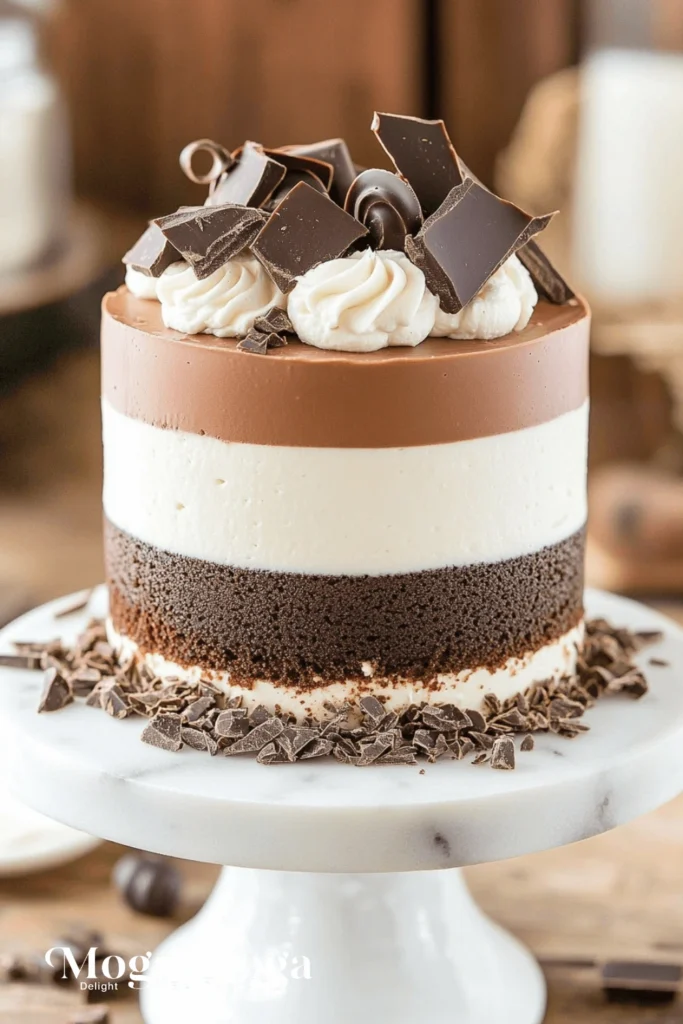
The first bite of a triple chocolate mousse cake does something magical. Rich, smooth, and luxuriously layered, this dessert balances the boldness of dark chocolate with the creamy sweetness of milk and white chocolate. It’s not just a treat — it’s a celebration of texture and taste. Whether you’re looking to impress guests at a dinner party or just treating yourself to something indulgent, this cake delivers in a big way.
The beauty of a triple chocolate mousse cake is in its contrast. Each layer offers its flavor profile, yet they blend in perfect harmony. It’s no surprise this dessert has become a favorite among chocolate lovers and baking enthusiasts alike. If you’re curious about how to make your own or just wondering what makes this cake so special, you’re in the right place.
Table of Contents
Why You’ll Love This Recipe
What makes this triple chocolate mousse cake a must-try? It hits the sweet spot — literally and figuratively — in so many ways. First off, it looks like a showstopper. The distinct layers of dark, milk, and white chocolate are not only visually striking but also offer a tiered experience of flavor.
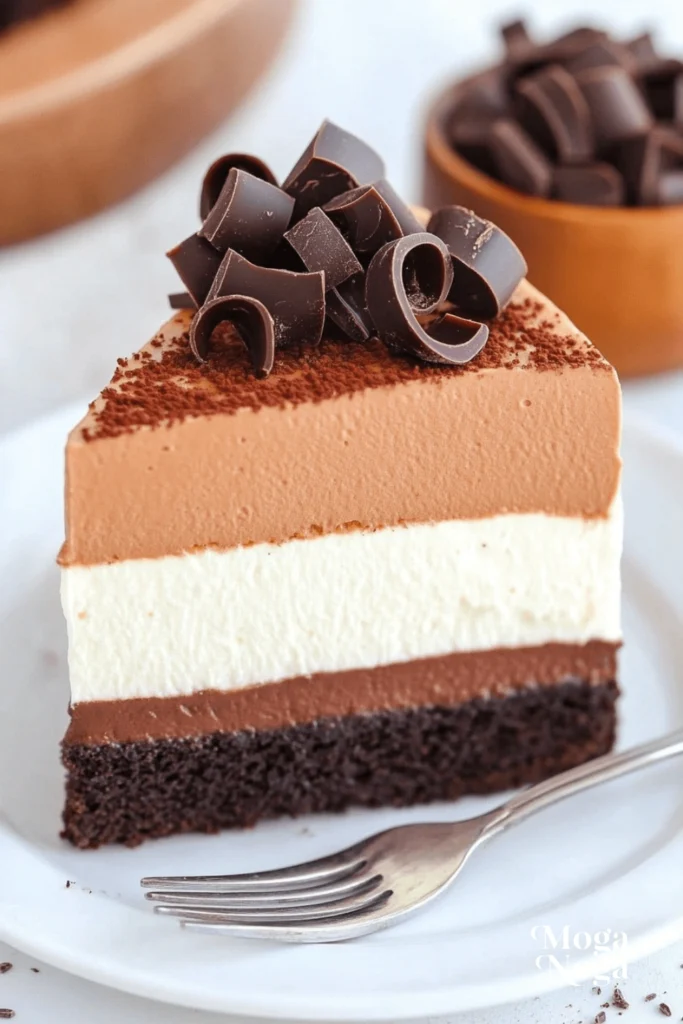
Secondly, while it might look intimidating, it’s actually quite manageable to make with some patience and the right guidance. The base is a soft, rich chocolate cake that anchors the mousse layers on top. The texture contrast — dense cake on the bottom, airy mousse on top — gives this dessert an incredible mouthfeel.
Most importantly, it’s customizable. Don’t love white chocolate? You can swap it for caramel or even a fruit-infused mousse. Hosting a holiday party? Dress it up with seasonal toppings. Want to go gluten-free? Easily done with a few ingredient swaps. This cake works hard for you, no matter the occasion.
It also stores well, making it a great make-ahead option. You can prepare it a day before a big gathering, and it still tastes freshly made when served. And for anyone who loves the meditative nature of multi-step baking, this cake is a rewarding project.
Detailed Ingredients and Instructions to make triple chocolate mousse cake
Let’s break it down. This cake has three major parts: the chocolate cake base and two mousse layers (milk and white chocolate), topped off with a dark chocolate mousse. Each component brings something different to the table.
The base layer starts with a soft chocolate sponge or flourless cake. You want something sturdy enough to hold mousse but soft enough to cut through without a mess. The cake should cool completely before adding any mousse, or you’ll end up with a melty disaster.
The milk chocolate mousse comes next. You’ll typically melt high-quality milk chocolate and fold it into whipped cream or a stabilized mixture that gives it structure. A touch of gelatin or agar-agar helps set the mousse, so it holds up when sliced.
After that layer chills and firms up, you’ll move on to the white chocolate mousse, which follows the same process. White chocolate can be trickier since it’s sweeter and softer, so balancing it with a splash of vanilla or even a bit of cream cheese can cut through the sweetness.
Finally, the dark chocolate mousse layer crowns the cake. This layer offers a rich, intense finish that offsets the previous two. If you want a strong chocolate punch, use a high cacao percentage — something around 70% or higher does the trick.
Each mousse layer needs time to chill and set before adding the next, so patience is key. Rushing can result in messy layers and uneven textures.
If you’re using a springform pan or acetate collar, it’s much easier to achieve those clean, bakery-style layers. Once fully assembled, let the cake chill overnight to set fully.
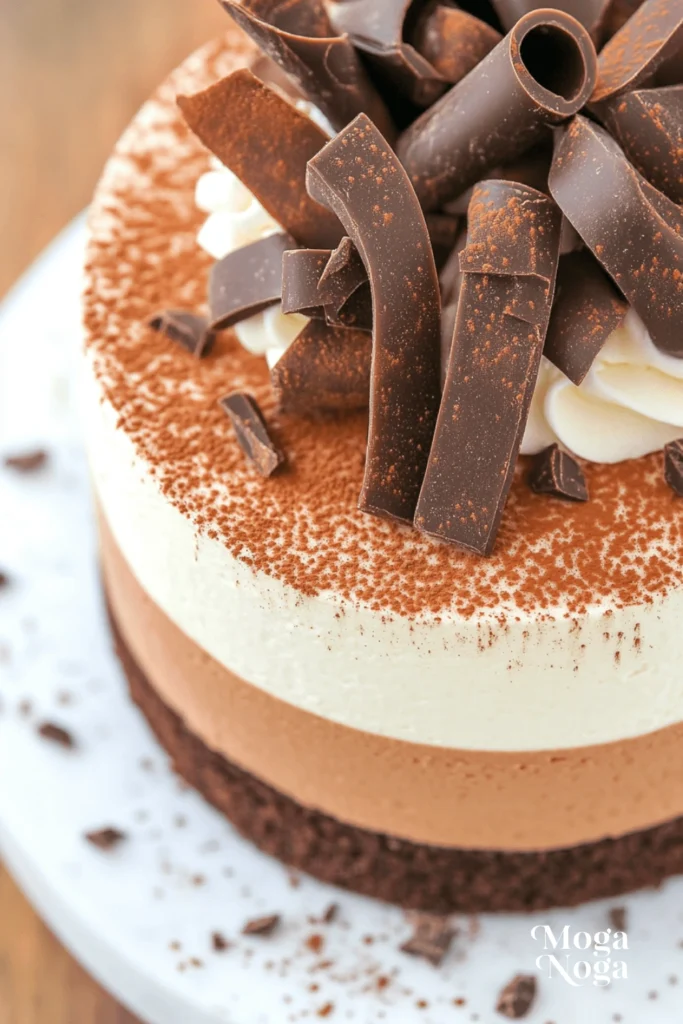
Before serving, remove it from the mold and smooth out the sides if needed. A thin layer of cocoa powder or some chocolate shavings on top adds a nice final touch without overpowering the flavor.
Tips, Variations, and Storage Options
If you’re a planner, this triple chocolate mousse cake dessert is your best friend. You can prepare each layer a day in advance or even freeze the assembled cake and thaw it before serving.
Looking to mix things up? Try a flavored mousse — raspberry, hazelnut, or espresso all pair beautifully with chocolate. A nut-based crust instead of a sponge cake gives it a gluten-free spin with extra texture. Crushed almonds or hazelnuts also add a lovely crunch.
For a lighter version, you can make it with Greek yogurt mousse layers instead of cream. Not quite as indulgent, but still delicious.
Storage-wise, the cake lasts up to five days in the fridge. Be sure to keep it covered so it doesn’t absorb other fridge odors. It also freezes well — just wrap slices individually in plastic wrap and store them in an airtight container. When ready to eat, thaw in the fridge overnight for best results.
Equipment Needed
To pull off a triple chocolate mousse cake without frustration, having the right tools makes all the difference. You don’t need a full professional kitchen setup, but a few essentials will make the process smoother and more enjoyable.
- Springform Pan: This is your best bet for creating clean layers and removing the cake without damaging it. A nine-inch springform pan is standard for most recipes.
- Hand Mixer or Stand Mixer: You’ll be whipping a lot of cream and beating eggs, so a reliable mixer is essential. It’ll save your arms and ensure proper texture.
- Double Boiler or Heatproof Bowl and Saucepan: Melting chocolate directly over heat is a recipe for burning it. A double boiler helps melt it gently and evenly.
- Offset Spatula: To spread mousse layers evenly and smoothly, an offset spatula gives you more control and finesse.
- Acetate Strips or Cake Collar (Optional): These help maintain super clean edges when layering mousse. You can skip them, but if you want a polished look, they’re worth it.
Related Recipes
If you love the idea of triple chocolate mousse cake, you might want to explore other chocolate-forward desserts that offer similar textures or techniques.
- Chocolate Mousse Cake: A single-layer version of the classic, without the tiers. Still rich and creamy, but quicker to assemble and ideal for simpler occasions.
- Black Forest Cake: Combines chocolate, whipped cream, and cherries for a rich and slightly tart dessert that balances sweetness beautifully.
- Chocolate Lava Cakes: A single-serving dessert with an oozy, decadent center. Quick to make, perfect for dinner parties or special nights.
- Chocolate Cheesecake: Creamy, dense, and ultra-rich — a great alternative if you want something sliceable and indulgent with less layering.
- White Chocolate Raspberry Tart: For a fruit-forward twist, this dessert mixes the creaminess of white chocolate with bright raspberry flavors, all in a crispy tart shell.
Pairing/Serving Suggestions
A triple chocolate mousse cake is a star on its own, but pairing it with the right flavors and drinks takes things up a notch. Think about contrasts and complements — flavors that cut through the richness or bring something new to the table.
- Fresh Berries: Raspberries, strawberries, or blackberries add acidity and a pop of color. They balance the sweetness and make your plate look elegant.
- Espresso or Coffee: Bitterness from coffee contrasts beautifully with chocolate, and the warm temperature works well alongside the cold mousse.
- Whipped Cream: A small dollop of unsweetened or lightly sweetened whipped cream lightens every bite and adds an airy texture.
- Mint or Basil Garnish: A few fresh herb leaves make the cake feel even more refined. They don’t overpower the flavor but give a refreshing aftertaste.
If you’re serving this for a special event, you can plate it with a drizzle of raspberry coulis, a dusting of cocoa powder, or a chocolate curl for that restaurant-level presentation.
Frequently Asked Questions
Can I make triple chocolate mousse cake ahead of time?
Yes, and it’s actually recommended. The cake needs time to chill and set, so making it the day before ensures perfect layers.
Is it gluten-free?
The mousse layers are naturally gluten-free, but the cake base may not be. You can use a flourless chocolate cake or nut-based crust to make it fully gluten-free.
Can I freeze it?
Absolutely. Freeze the whole cake or individual slices. Just wrap it well in plastic wrap and place it in an airtight container. Thaw in the fridge before serving.
How long does it last in the fridge?
Stored properly, it stays fresh for up to five days. Keep it covered to maintain texture and prevent it from absorbing fridge odors.
What chocolate works best?
Use high-quality chocolate for each layer. Couverture or baking chocolate melts better than chips. Go for a higher cacao percentage for the dark layer, around 70%, and something smoother for milk and white chocolate.
Do I need gelatin?
Gelatin helps stabilize the mousse, so it holds up when sliced. You can also use agar-agar as a vegetarian alternative.
How do I avoid runny mousse?
Make sure the whipped cream has stiff peaks, and the chocolate is cooled but still fluid before folding. Also, let each layer set before adding the next one.
Nutrition Information
Let’s talk about what you’re getting in each slice of this dessert. While exact numbers can vary depending on specific ingredients and serving size, here’s a general idea based on a nine-inch cake cut into twelve servings.
- Calories per slice: Around 450 to 500
- Protein: About 6 to 8 grams
- Fat: Roughly 35 grams
- Carbohydrates: Approximately 30 grams
- Sugar: Close to 25 grams
- Fiber: Around 3 grams, thanks to the chocolate content
This dessert is undeniably rich, so it’s best enjoyed in moderation. Still, if you’re treating yourself, every bite is worth it.
You can reduce calories slightly by using lower-fat cream or reducing sugar, but the mousse texture might not be as luxurious. If you’re serving this at a party, consider offering small slices — a little goes a long way.
Seasonal and Occasion Variations
A triple chocolate mousse cake is incredibly versatile. It adapts beautifully to different seasons and celebrations with just a few thoughtful tweaks. Whether you’re aiming for cozy winter comfort or a light spring refresh, there’s a version for every occasion.
Winter/Holiday Season: Add a hint of peppermint extract to one of the mousse layers — typically the white chocolate — for a festive touch. Crushed candy canes on top give it crunch and visual flair. Alternatively, a spiced base with a touch of cinnamon or nutmeg creates a warm holiday flavor profile.
Spring Brunch or Easter: Brighten things up by folding in a bit of lemon zest or vanilla bean into the white chocolate mousse. Top the cake with edible flowers or pastel-colored chocolate shavings for a seasonal presentation. Serve alongside fresh berries for a light finish.
Summer Parties or Barbecues: Go for a fruit-chocolate fusion by adding a thin layer of raspberry coulis or fresh fruit puree between the mousse layers. You can also top the finished cake with a mix of seasonal fruits like strawberries, blueberries, or cherries for a refreshing contrast to the richness.
Fall Gatherings: Introduce a nutty or earthy element — think hazelnut praline in the base or a drizzle of caramel over the dark chocolate mousse. A dusting of cinnamon or a topping of candied pecans fits perfectly with autumn’s flavor palette.
Birthday or Celebration: Amp up the decadence by adding a thin layer of chocolate ganache over the top or pipe whipped cream rosettes around the edge. Decorate with sprinkles, edible glitter, or even chocolate truffles to make it party-ready.
Valentine’s Day: No better time to bring out this dessert. Serve individual heart-shaped portions or top the cake with chocolate-dipped strawberries. A touch of rose water in the mousse gives it a subtle romantic note without being overpowering. Each of these variations keeps the heart of the cake intact while giving it a seasonal or thematic twist. You don’t need to overhaul the whole recipe — small, smart adjustments can totally transform the experience.
My Recipe Tips
After making more than a few of these cakes, I’ve picked up some essential tips that can make the process smoother and the result more polished. These little tweaks can save you a lot of frustration — and give you that “wow” factor with less stress.
- Use room-temperature ingredients for better mixing. Cold ingredients can cause your melted chocolate to seize or your mousse to break.
- Fold, don’t stir. When combining chocolate and whipped cream, be gentle. Stirring too hard deflates the mixture and makes it dense instead of light and airy.
- Don’t rush the setting process. Each mousse layer needs time to firm up in the fridge before adding the next. Plan at least 30 to 45 minutes of chilling between layers. Overnight is even better.
- Level each layer. After spreading each mousse layer, gently shake the pan or tap on the counter to smooth the surface. This keeps the final cake looking neat when sliced.
- Line your pan. Whether you’re using parchment on the bottom or acetate around the edges, it helps with clean release and easier cleanup.
- Taste your mousse before setting. Want it sweeter? Add a little extra sugar. Need more intensity? Add a pinch of salt or a splash of espresso. It’s easier to adjust before it sets.
- Be precise with your measurements. This isn’t the place to eyeball ingredients — ratios matter when it comes to mousse consistency. A kitchen scale is your best friend here.
- Use quality chocolate. It’s the star of the show. Bargain chocolate might save a few bucks, but it won’t melt as smoothly or taste as rich. Choose chocolate you’d enjoy eating on its own.
- Trim for clean slices. When you’re ready to serve, dip your knife in hot water and wipe it clean between slices. It makes every piece look sharp and professional.
These are the kinds of little things that elevate your cake from good to bakery-level. They also help make the whole process more enjoyable and less stressful.
Conclusion
A triple chocolate mousse cake is more than just a dessert — it’s a layered experience of flavor, texture, and visual appeal. Whether you’re celebrating a birthday, hosting a dinner, or just indulging in something special for yourself, this cake is a guaranteed crowd-pleaser. It’s rich without being overwhelming, elegant without being complicated, and customizable without losing its charm.
You don’t need to be a pastry chef to make it, but you’ll feel like one when it’s done. With the right tools, a bit of patience, and a love for chocolate, you can create a dessert that looks as good as it tastes. And once you’ve made it once don’t be surprised if it becomes a repeat request from friends and family.
Looking for more chocolate desserts or layer cake inspiration? Keep exploring — your next favorite recipe could be just one mousse away.

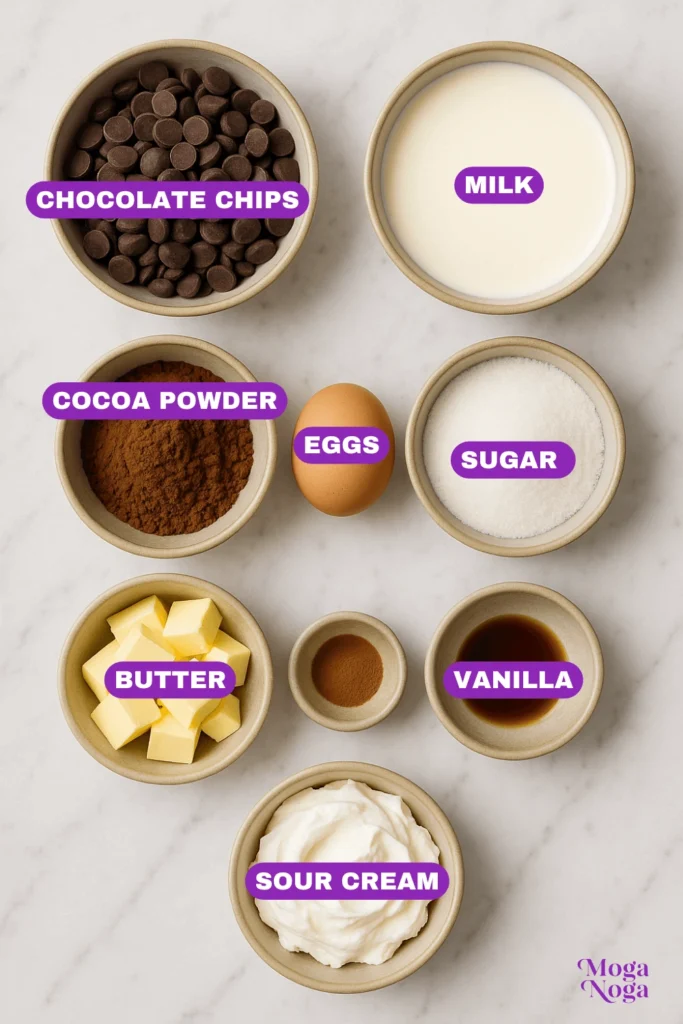
Ingredients
For the cake:
1 cup all-purpose flour
1/2 cup cocoa powder
1 teaspoon baking powder
1/2 teaspoon baking soda
1/4 teaspoon salt
1/2 cup unsalted butter, softened
1 cup granulated sugar
2 large eggs
1 teaspoon vanilla extract
1/2 cup whole milk
1/2 cup boiling water
For the dark chocolate mousse:
4 oz dark chocolate (70% cocoa), chopped
1/2 cup heavy cream
2 tablespoons powdered sugar
1/2 teaspoon vanilla extract
For the milk chocolate mousse:
4 oz milk chocolate, chopped
1/2 cup heavy cream
2 tablespoons powdered sugar
1/2 teaspoon vanilla extract
For the white chocolate mousse:
4 oz white chocolate, chopped
1/2 cup heavy cream
2 tablespoons powdered sugar
1/2 teaspoon vanilla extract
For the topping:
Whipped cream (optional)
Shaved chocolate or chocolate curls (optional)
Instructions
Make the cake: Preheat your oven to 350°F (175°C). Grease and line an 8-inch round cake pan with parchment paper. In a medium bowl, whisk together the flour, cocoa powder, baking powder, baking soda, and salt. In a separate large bowl, cream together the softened butter and sugar until light and fluffy. Add the eggs one at a time, mixing well after each addition. Stir in the vanilla extract. Gradually add the dry ingredients, alternating with the milk, until fully combined. Finally, add the boiling water and mix until smooth (the batter will be thin). Pour the batter into the prepared pan and bake for 30-35 minutes, or until a toothpick inserted into the center comes out clean. Let the cake cool completely before assembling the mousse layers.
Make the dark chocolate mousse: Melt the dark chocolate in a heatproof bowl over a pot of simmering water (double boiler method) or in the microwave in 20-second intervals. Let the chocolate cool slightly. In a separate bowl, whip the heavy cream with the powdered sugar until stiff peaks form. Gently fold the melted dark chocolate and vanilla extract into the whipped cream. Set aside.
Make the milk chocolate mousse: Repeat the same process for the milk chocolate mousse. Melt the milk chocolate and let it cool slightly. Whip the heavy cream with powdered sugar until stiff peaks form, then fold in the melted milk chocolate and vanilla extract.
Make the white chocolate mousse: Similarly, melt the white chocolate and let it cool slightly. Whip the heavy cream with powdered sugar until stiff peaks form, then fold in the melted white chocolate and vanilla extract.
Assemble the cake: Once the cake has cooled, carefully slice it in half horizontally to create two layers. Place the bottom layer on a serving plate. Spread a layer of dark chocolate mousse evenly on top. Add the second layer of cake, then spread the milk chocolate mousse on top of the cake layer. Finally, top with the white chocolate mousse, smoothing it out evenly.
Chill the cake: Refrigerate the assembled cake for at least 3 hours, or preferably overnight, to allow the mousse to set.
Serve: Before serving, top with whipped cream and shaved chocolate or chocolate curls, if desired. Slice and enjoy the decadent layers of chocolate mousse!
