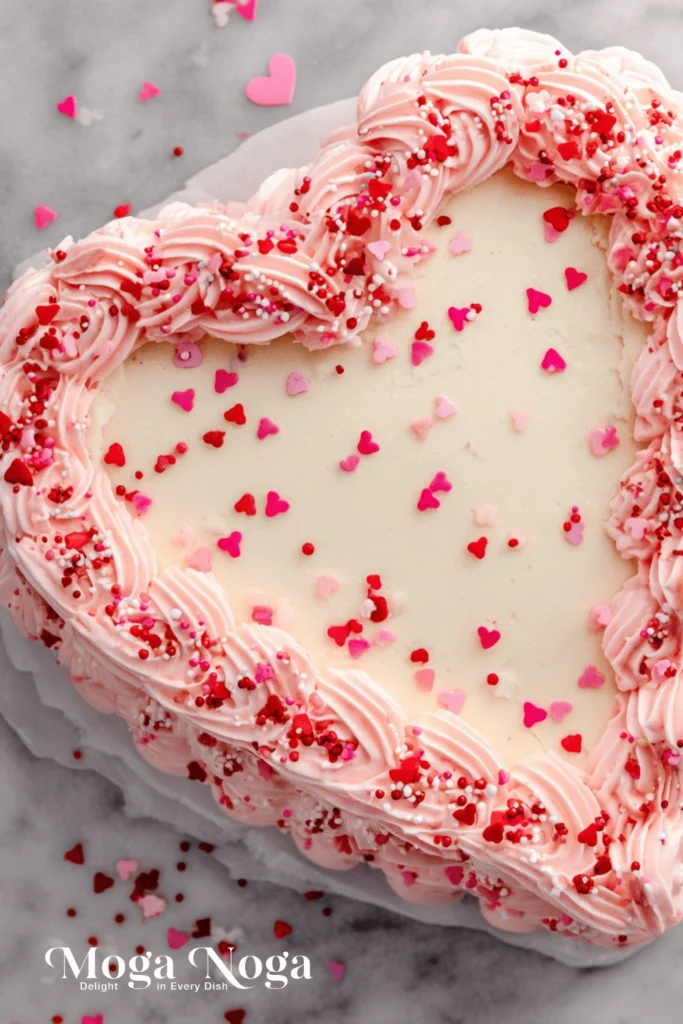
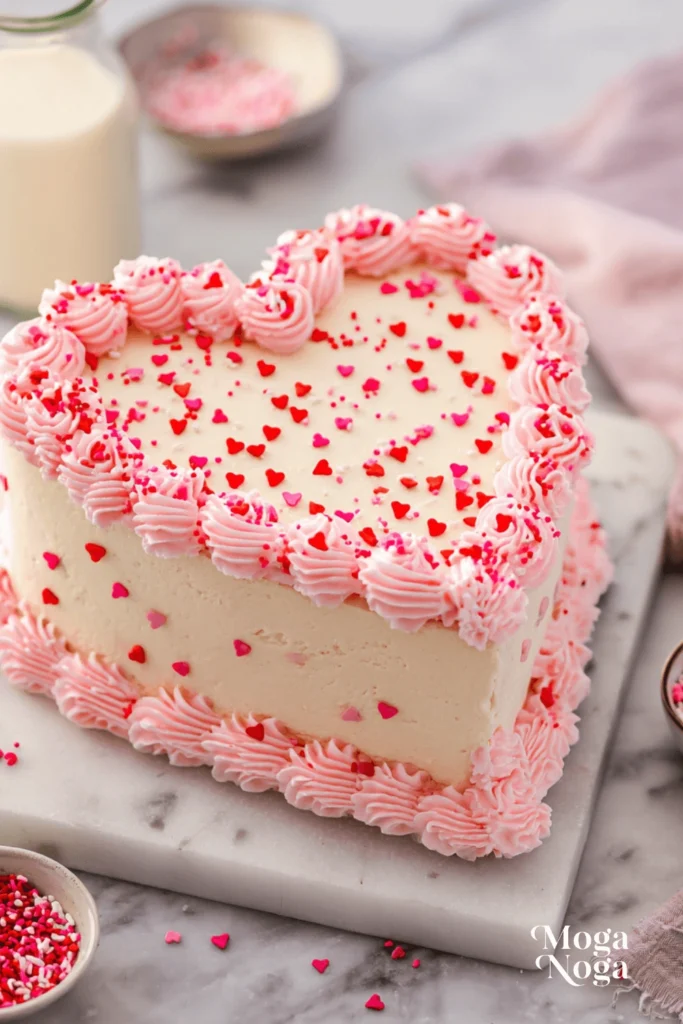
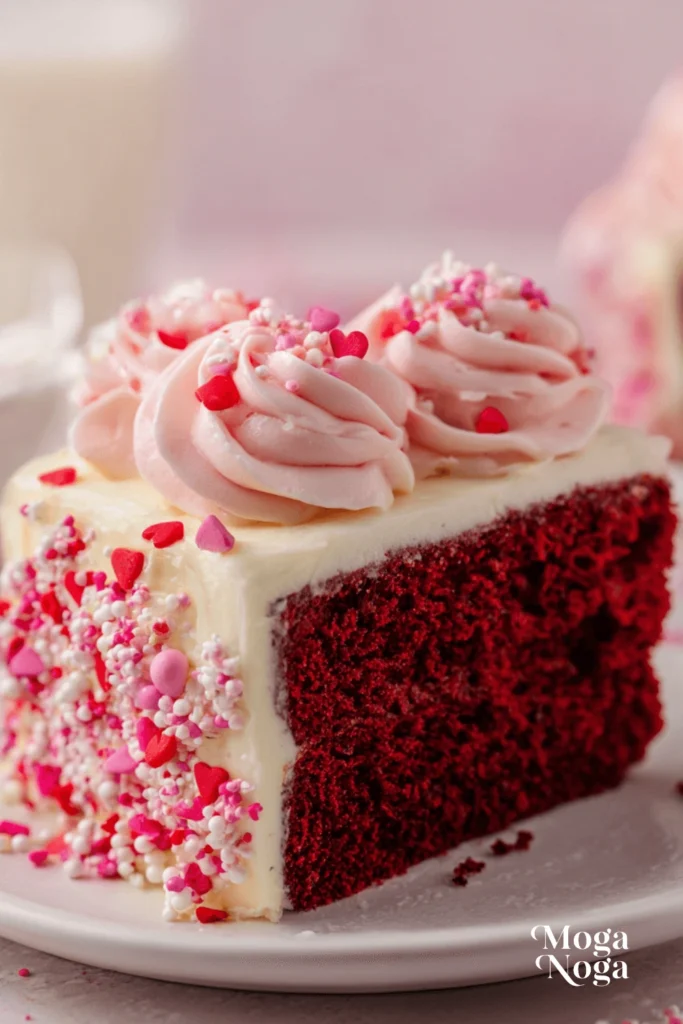
Want to bake something that looks like love and tastes even better? This Valentine’s Heart Red Velvet Cake is your answer. It’s rich, moist, cocoa-kissed, and shaped like a heart—perfect for date nights, Galentine’s, or treating yourself.
No fancy skills needed. This beginner-friendly recipe uses simple ingredients and delivers big on flavor and wow factor. Whether it’s your first red velvet or your fiftieth, this version adds a sweet, memorable twist.
Table of Contents
Why You’ll Love This Recipe
There’s something about red velvet that feels a little fancier than other cakes. The crumb is tender, the flavor has a subtle hint of cocoa, and the color is just plain fun. When you shape it like a heart, the whole dessert takes on new meaning.
But the best part? This cake isn’t hard to make. You don’t need any special baking experience to get it right. The ingredients are straightforward, the process is simple, and the results are stunning. It’s one of those recipes that looks impressive but feels totally doable—even if you’re baking it the night before Valentine’s Day.
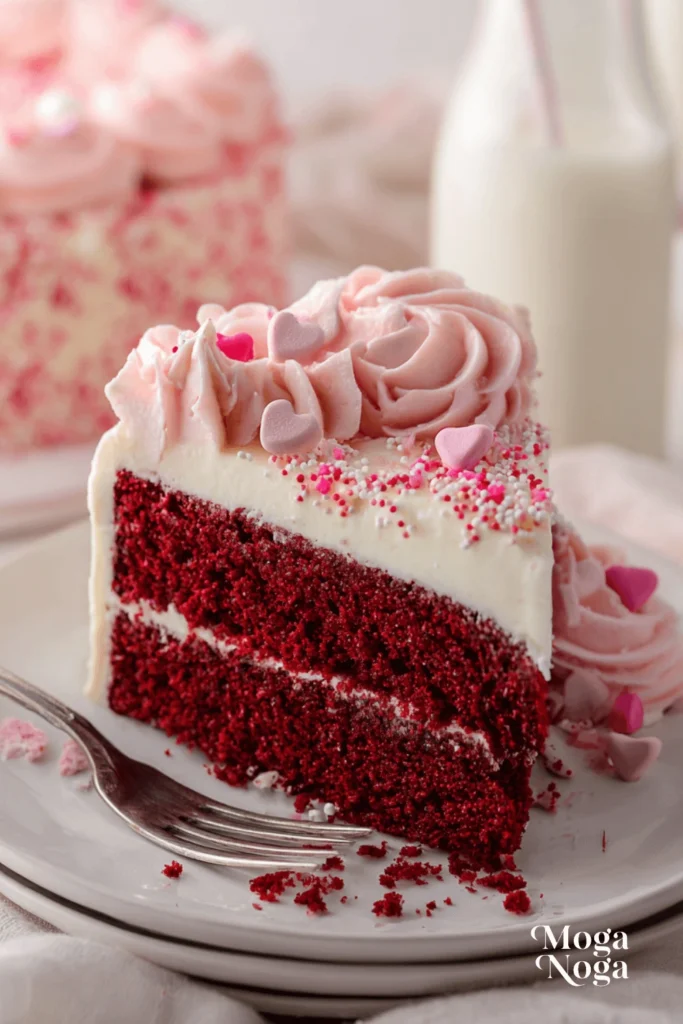
What really sets this apart is the balance of flavors. The tang from the buttermilk and vinegar keeps it from being overly sweet. Paired with a rich cream cheese frosting, it’s just the right amount of indulgent. And because it’s homemade, you can adjust things to your taste—less sweet, more cocoa, or a lighter frosting layer.
It’s also a really fun cake to share. Whether you’re baking with your kids, surprising a partner, or just making something nice for yourself, this cake feels like a celebration. People will want seconds. Maybe even thirds.
Detailed Ingredients and Instructions
To make the perfect Valentine’s Heart Red Velvet Cake, let’s break things down. Starting with the ingredients:
Flour: Stick to all-purpose flour for a sturdy yet soft texture. Don’t substitute with cake flour here—it changes the crumb.
Sugar: Granulated white sugar is all you need. It balances out the cocoa’s slight bitterness.
Cocoa Powder: Use unsweetened cocoa powder. A little goes a long way—this isn’t a chocolate cake, but you want that subtle cocoa note.
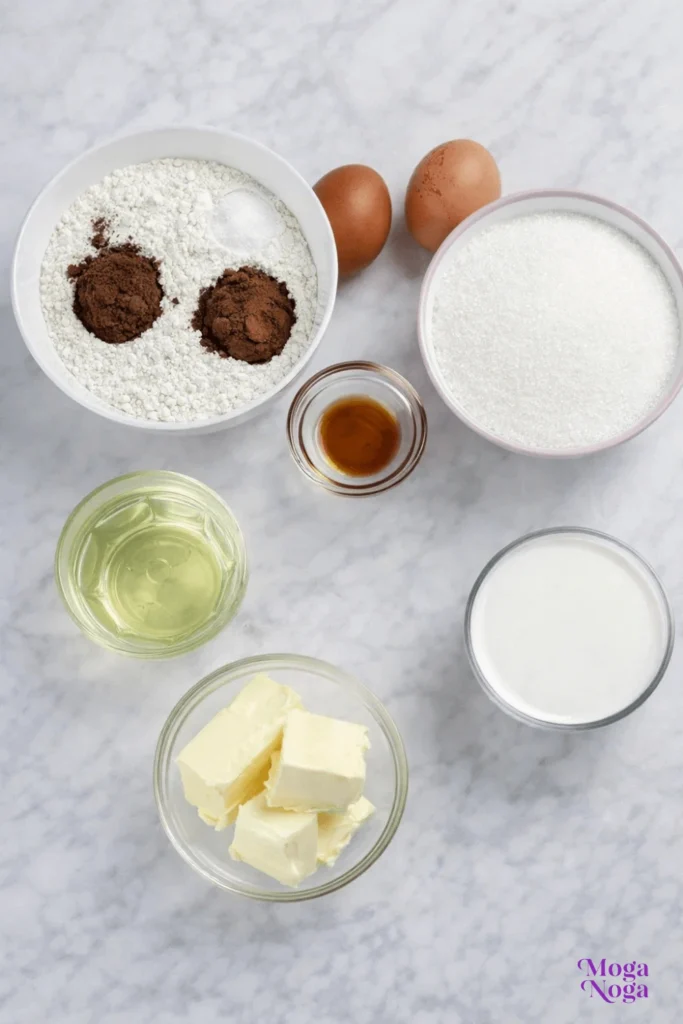
Baking Soda and Vinegar: The combo gives the cake lift. It’s what makes red velvet soft and slightly airy.
Eggs: They add richness and structure. Make sure they’re at room temp for better mixing.
Buttermilk: This is key for flavor and tenderness. If you don’t have it, you can DIY by adding vinegar or lemon juice to milk.
Oil: Use vegetable oil instead of butter. It keeps the cake moist longer, which is great if you’re making it ahead.
Red Food Coloring: You’ll need a fair amount to get that bold red. Gel coloring gives a stronger tint than liquid.
Vanilla Extract: Adds depth and rounds out the flavor.
Cream Cheese and Butter (for frosting): Let both soften before mixing. You want a smooth, spreadable consistency.
Powdered Sugar: Sift it before adding to your frosting to avoid lumps.
Once you’ve gathered everything, it’s just a matter of mixing dry and wet ingredients separately, then combining them. Pour the batter into a heart-shaped cake pan (or make your own heart using two round and square pans—more on that later). Bake until a toothpick inserted in the center comes out clean. Let it cool completely before frosting. You’ll want to frost in layers, with a crumb coat first if you want a cleaner finish.
Tips, Variations, and Storage Options
Making a beautiful Valentine’s Heart Red Velvet Cake doesn’t have to be stressful. A few thoughtful tips can help ensure success, and if you want to switch things up, there are plenty of variations to try. Let’s start with some practical baking tips.
Baking Tips:
- Don’t overmix the batter. Once the wet and dry ingredients are combined, stir just until smooth. Overmixing can make the cake dense.
- Use parchment paper. Line the bottom of your heart pan with parchment to prevent sticking. Grease the sides with butter or nonstick spray.
- Let ingredients come to room temp. Eggs, buttermilk, and cream cheese all blend more smoothly when not cold from the fridge.
- Cool the cake completely. This step really matters. Even slightly warm cake will cause your frosting to melt and slide off.
- Do a crumb coat. If you’re going for a neat look, frost the cake with a thin layer first, chill for 20 minutes, then add a thicker final layer.
Easy Variations:
You don’t have to stick to tradition if you’re in the mood to experiment. Here are a few simple ways to change things up:
- Mini cakes: Use heart-shaped silicone molds or cupcake tins to create individual servings. These are great for gifting or serving at parties.
- Red velvet cupcakes: Same batter, just in a cupcake pan. They bake faster and are easier to decorate with piping bags.
- Chocolate heart cake: Skip the red food coloring and add a little more cocoa. You’ll get a chocolate version that still has the tender red velvet texture.
- Pink velvet: Use less food coloring for a softer, pastel version of the cake—great for baby showers or spring celebrations.
- Layered heart cake: Bake two or three thinner heart layers and stack them with frosting in between for a show-stopping tiered dessert.
Storage Tips:
Red velvet cake stores surprisingly well, especially when frosted.
- Room temp: If unfrosted, the cake layers can sit wrapped at room temperature for a day or two.
- Fridge: Once frosted with cream cheese icing, store it in the refrigerator. Wrap lightly in plastic or use a cake container to keep it fresh.
- Freezer: You can freeze unfrosted layers for up to 2 months. Wrap tightly in plastic and then foil. Thaw overnight in the fridge before frosting.
If you’re making the cake ahead of time, you can bake the layers a day early and frost the next morning. The flavors often get even better after sitting for a bit, especially once the frosting sets.
Equipment Needed
You don’t need anything fancy to make a great Valentine’s Heart Red Velvet Cake. Just a few basics will do:
- 1. Heart-Shaped Cake Pan: This is the key to getting that classic Valentine’s look. If you don’t have one, no worries—you can create a heart shape by using one square pan and one round pan. Cut the round cake in half and place each half against adjacent corners of the square cake to form a heart.
- 2. Mixing Bowls: Two are best—one for wet ingredients, one for dry. Glass or stainless steel work great.
- 3. Electric Mixer or Whisk: You can mix by hand, but a handheld mixer or stand mixer makes the frosting step easier and faster.
- 4. Cooling Rack: Helps the cake cool evenly and prevents soggy bottoms.
- 5. Offset Spatula or Butter Knife: Useful for spreading frosting smoothly and cleanly across the cake.
Optional but helpful tools include parchment paper for lining your pan, a sifter for powdered sugar, and piping bags if you want to decorate with swirls or borders.
Related Recipes
If you love red velvet, or just enjoy baking for holidays and special moments, here are some other recipes you might want to try:
- Classic Red Velvet Cupcakes: These have all the flavor of red velvet cake in a grab-and-go size. Perfect for bake sales or gifting.
- Cream Cheese Frosted Sugar Cookies: Soft sugar cookies topped with a creamy tangy frosting—easy to cut into heart shapes and decorate.
- Chocolate Dipped Strawberries: Simple but elegant, and they make a great pairing with a slice of cake for dessert.
- Red Velvet Cake Cookies: Soft, chewy cookies made with red velvet cake mix or scratch batter. Shape them into hearts before baking or use a cutter afterward. Finish with a swirl of cream cheese frosting or a sprinkle of white chocolate chips.
- Pink Lemonade Cake: For a lighter, springy twist, try this citrus-forward cake with a soft pink hue. It’s refreshing and pairs nicely with berries.
These ideas round out any dessert table and keep the theme fun and festive, whether you’re baking for two or twenty.
Pairing/Serving Suggestions
A Valentine’s Heart Red Velvet Cake is already the star of the show, but pairing it with the right drink or side makes the experience even better. Whether you’re setting up a romantic dinner or a Galentine’s Day party, a little planning around presentation and pairing can go a long way.
Drinks That Pair Well:
- Coffee: A bold cup of coffee balances out the sweetness of the cake. Try a dark roast or espresso shot with a splash of milk.
- Hot chocolate: A creamy hot cocoa with a sprinkle of cinnamon makes for a cozy pairing, especially on a chilly February night.
- Champagne or Sparkling Cider: The light bubbles contrast beautifully with the dense, rich texture of the cake. Plus, it adds a celebratory touch.
- Milk: Simple but classic. Kids especially love this combo, but even adults can appreciate the nostalgic pairing.
Serving Ideas:
- Fresh berries: Add raspberries or strawberries on the side for a pop of freshness and color. Bonus: they pair well with the tangy cream cheese frosting.
- Whipped cream: A dollop of lightly sweetened whipped cream adds softness and balances the richness of the cake.
- Mini heart toppers or sprinkles: For a festive vibe, decorate the top with edible heart confetti or DIY toppers.
- Chocolate drizzle: A thin drizzle of melted dark or white chocolate over each slice adds elegance and a little extra indulgence.
If you’re planning a full menu, keep the dessert light. A hearty red velvet cake follows best after a lighter dinner like pasta primavera, grilled chicken salad, or a simple soup and bread combo. You want people to have room for dessert—and maybe even seconds.
Frequently Asked Questions
Is red velvet just chocolate cake with food coloring?
Not exactly. Red velvet has a smaller amount of cocoa than traditional chocolate cake and includes buttermilk and vinegar, which give it a unique tang and texture. The food coloring gives it the signature red color, but the flavor is more subtle and layered.
Can I use natural food coloring?
Yes, but natural red food coloring can sometimes bake into a more muted shade, especially with cocoa in the batter. Beetroot powder is a common natural alternative, though the final color might be more of a deep pink or burgundy.
What if I don’t have a heart-shaped pan?
You can make your own! Bake the batter in one 8×8 square pan and one 8-inch round pan. Cut the round cake in half and position the halves on adjacent sides of the square to form a heart. Frost to bring it all together.
How do I prevent my cake from drying out?
Use oil instead of butter in the batter—it helps retain moisture. Also, don’t overbake. Start checking a few minutes before the timer goes off. Store leftover cake in an airtight container.
Can I make this cake ahead of time?
Definitely. You can bake the layers up to two days in advance and frost the day you plan to serve. Or freeze the layers (unfrosted) and thaw the night before. Frosted cake can be stored in the fridge for up to four days.
What’s the best frosting for red velvet cake?
Traditional cream cheese frosting is the go-to and pairs perfectly with the tangy flavor of the cake. You can also use buttercream, mascarpone frosting, or even a whipped cream-based option if you prefer something lighter.
Can I make this gluten-free?
Yes, use a gluten-free all-purpose flour blend that includes xanthan gum. The texture might be slightly different, but it still works well. Check all other ingredients to ensure they’re gluten-free too.
Nutrition Information
Here’s a general idea of the nutrition profile for a standard slice of Valentine’s Heart Red Velvet Cake with cream cheese frosting (based on 12 slices per cake):
- Calories: Around 450 per slice
- Fat: 22g (mostly from oil and cream cheese frosting)
- Saturated Fat: 10g
- Carbohydrates: 58g
- Sugar: 40g
- Protein: 5g
- Fiber: 1g
These numbers can shift depending on serving size, exact ingredients, and toppings. If you’re aiming for a lighter version, consider using less frosting or swapping in a low-fat cream cheese. Cupcake-sized portions can also help with portion control while still delivering the same flavor.
This cake is definitely a treat—meant for enjoying on special occasions rather than as an everyday dessert. But that’s part of what makes it feel special.
Seasonal and Occasion Variations
While this cake is tailor-made for Valentine’s Day, you can easily adapt it for other holidays, celebrations, and personal milestones. The color, shape, and toppings are flexible enough to make this recipe work year-round.
- Anniversaries and Date Nights: Keep the heart shape and dress it up with chocolate-dipped strawberries or gold sprinkles for a more elegant vibe. Add a short personalized message on top in piped white chocolate for a sweet surprise.
- Birthday Version: Swap the red for a favorite color—like royal blue, purple, or even rainbow layers. Use vanilla or chocolate frosting, add candles, and customize the decorations based on the birthday person’s favorite things.
- Christmas Twist: Turn it into a holiday red velvet cake with green-tinted cream cheese frosting or a dusting of crushed peppermint candies. Instead of a heart, use a tree or ornament-shaped pan, or keep it round and decorate with red and green sprinkles.
- Fourth of July or Summer Parties: Bake the cake in a round or square pan, cut into small cubes, and layer with whipped cream and blueberries for a red, white, and blue trifle. It’s lighter and great for warm-weather celebrations.
- Baby Showers and Gender Reveals: Make a “pink velvet” or “blue velvet” version with the same base recipe—just adjust the food coloring. Hide a layer of colored cake inside and cover with white frosting to reveal the gender when cut.
- Halloween: Black cocoa or dark chocolate coloring turns this into a “gothic” red velvet cake. Add orange frosting or candy eyes for a spooky twist. A heart shape still works—think “broken heart” or “monster heart” themes.
No matter the occasion, you can play with colors, decorations, and presentation while keeping the base recipe mostly the same. It’s all about creativity and making the cake feel fun and personal.
My Recipe Tips
Want to make your Valentine’s Heart Red Velvet Cake look bakery-level but still homemade? Here are some tips I’ve picked up that make a real difference:
- Get the color right: Use gel food coloring instead of liquid. It gives a deeper, richer red without thinning out your batter. Start with a small amount and build up as needed.
- Cool completely before frosting: It’s tempting to rush this step, but warm cake will cause the frosting to melt and slide. Give it time—at least an hour at room temp, or chill in the fridge to be sure.
- Crumb coat helps everything: Spread a thin layer of frosting over the whole cake and chill it for 15–20 minutes before applying the final layer. It seals in loose crumbs and makes the final coat smoother.
- Use a serrated knife for clean slices: Wipe the blade between cuts to keep each slice tidy and photo-ready.
- Make ahead and decorate later: Bake the cake the night before and wrap it tightly. Frost and decorate the next day. It saves time and actually improves the flavor and texture.
- Personalize with toppings: Even a few fresh berries or sprinkles make a big visual difference. Don’t feel pressure to go full Pinterest-level fancy. A simple heart drawn in cocoa powder or powdered sugar adds a beautiful, subtle touch.
- Practice makes better: Don’t stress if the heart isn’t perfectly symmetrical or the frosting looks rustic. It’s the flavor and effort that matter most. And if you’re sharing it with someone you love, they’re not going to notice the flaws anyway.
Conclusion
A Valentine’s Heart Red Velvet Cake is one of those recipes that delivers in every way—it’s beautiful, full of flavor, and fun to make. Whether you’re baking it for someone special or just because you love cake (and who doesn’t?), it’s a sweet way to celebrate love, connection, and creativity in the kitchen.
With simple ingredients, a few easy techniques, and lots of room for customization, this recipe fits a wide range of occasions beyond just Valentine’s Day. It’s not just about the cake—it’s about the thought and care behind it. And sometimes, that’s the best gift you can give.
Thanks for reading and baking along. If you enjoyed this recipe, check out the other treats and holiday ideas on the blog. There’s always something new to try.

Ingredients
Cake
2½ cups all-purpose flour
2 tablespoons unsweetened cocoa powder
1 teaspoon baking soda
½ teaspoon salt
½ cup unsalted butter, softened
1½ cups granulated sugar
2 large eggs, room temperature
1 teaspoon vanilla extract
1 cup buttermilk, room temperature
1 tablespoon red food coloring
1 teaspoon white vinegar
Cream cheese frosting
8 oz cream cheese, softened
½ cup unsalted butter, softened
3 cups powdered sugar
1 teaspoon vanilla extract
Optional decoration
Fresh strawberries
Valentine sprinkles
Instructions
Preheat your oven to 350°F (175°C). Grease and flour a heart-shaped cake pan or two 8-inch round pans.
In a bowl, whisk together flour, cocoa powder, baking soda, and salt. Set aside.
In a large bowl, beat butter and granulated sugar until light and fluffy.
Add eggs one at a time, mixing well after each addition. Stir in vanilla extract.
Mix in the buttermilk and red food coloring until evenly combined.
Gradually add the dry ingredients, mixing just until smooth.
Stir in the vinegar gently (this helps activate the baking soda).
Pour the batter into the prepared pan(s) and smooth the top.
Bake for 28–32 minutes, or until a toothpick inserted in the center comes out clean.
Let the cake cool completely before frosting.
To make the frosting, beat cream cheese and butter until smooth. Add powdered sugar and vanilla, beating until fluffy.
Frost the cooled cake generously and decorate as desired. Slice and serve.
